使用 LangChain & LangGraph 打造自己的 AI 助理

TL;DR
大家好,最近幫公司做了一個 Slack AI 機器人,幫團隊節省一些回答重複問題的時間,我覺得效果不錯,所以決定來分享一下我是如何利用 LangChain 以及 LangGraph 來開發這個機器人的。
Google AI Studio

在開始之前我們需要先到 Google AI Studio 發行一把 API Key 作為等等要使用 LLM 的前置作業。

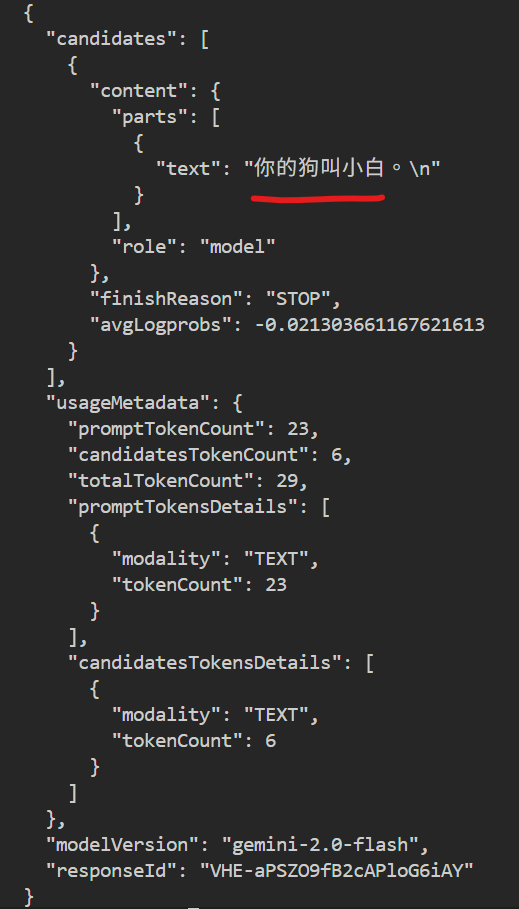
拿到 API Key 之後可以簡單使用 curl 測試一下。
curl -X POST -H 'Content-Type: application/json' https://generativelanguage.googleapis.com/v1beta/models/gemini-2.0-flash:generateContent?key=$GOOGLE_API_KEY \
-d '{
  "contents": [
    {
      "role": "user",
      "parts": [
        {
          "text": "我養了一隻狗,叫做小白。"
        }
      ]
    },
    {
      "role": "model",
      "parts": [
        {
          "text": "好的,我知道你的狗叫小白。"
        }
      ]
    },
    {
      "role": "user",
      "parts": [
        {
          "text": "我的狗叫什麼名字?"
        }
      ]
    }
  ]
}'
可以看到只要把對話紀錄帶給大模型,就可以提問一些需要記憶才可以回答的問題,而不是只是一問一答,讓整個對話可以更連貫。
LangChain
在看完前面簡單用 API 直接呼叫大模型之後,我們來看看 LangChain 這個框架,它可以幫我們省去很多自己組裝 API 請求的麻煩事情,以及有提供很多像是提示詞模板等方便的功能,讓我們可以少寫一些程式碼。
初始化專案
Install uv on macOS and Linux.
curl -LsSf https://astral.sh/uv/install.sh | sh

uv init langchain-playground
cd langchain-playground
uv add langchain langchain-google-genai
建立最簡單的 LLM 應用程式


以下這個範例會參考以上兩個官方文件,快速建立一個 LLM 應用程式並觀察 LangChain 如何幫我們去呼叫 Google Gemini API 的。
首先剛剛專案初始化完成後會在資料夾下有個 hello.py 我們把它重新命名成 main.py 並貼上以下程式碼。
from langchain.chat_models import init_chat_model
from langchain_core.messages import HumanMessage, SystemMessage
from langchain.globals import set_debug
set_debug(True)
model = init_chat_model("gemini-2.0-flash-001",
model_provider="google_genai")
messages = [
SystemMessage("Translate the following from English into Chinese"),
HumanMessage("hi!"),
]
if __name__ == "__main__":
result = model.invoke(messages)
print(f"{'='*36} Result {'='*36}")
print(result)
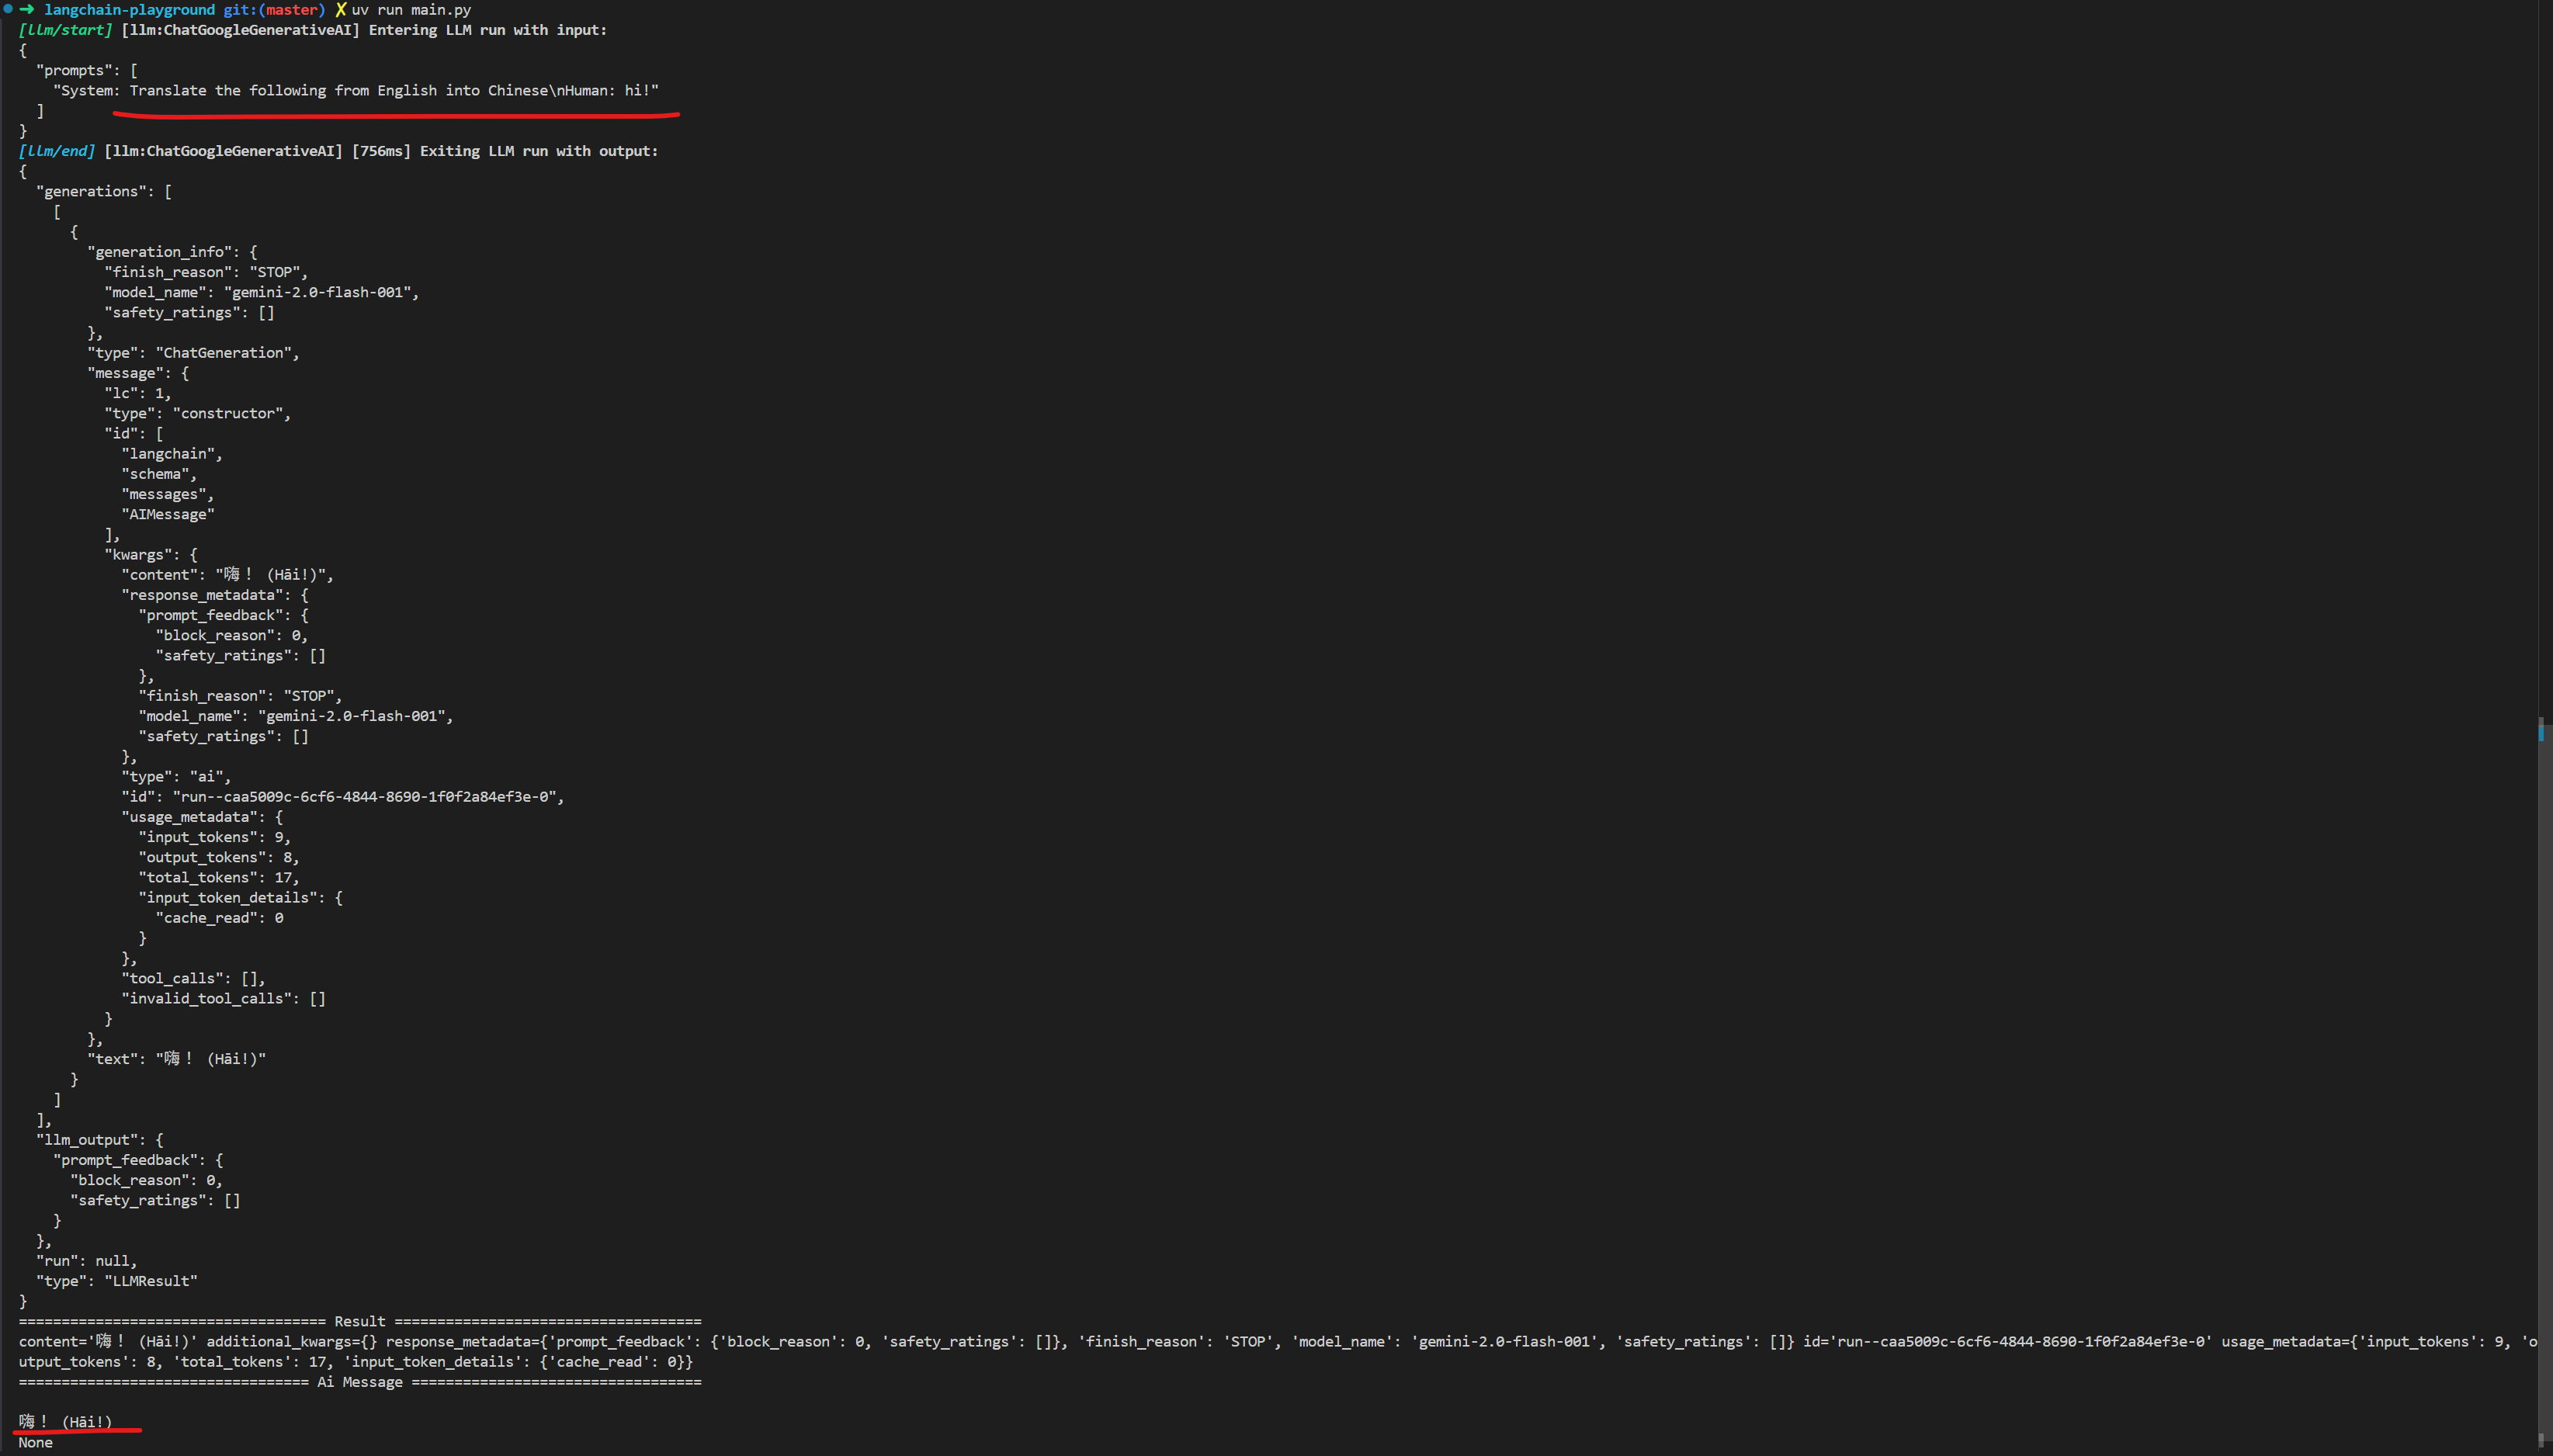
print(result.pretty_print())然後打開終端機執行以下命令。
export GOOGLE_API_KEY=your key
uv run main.py
接著你就可以看到,LangChain 幫我們帶上了 System Prompt 以及使用者的輸入,並且呼叫大模型得到我們想要的結果。
使用提示詞樣板

接下來我希望可以動態更改提示詞裡的部分內容,例如下面的範例裡,我想要改翻譯的目標語言。
我可利用 ChatPromptTemplate 搭配不同的 PromptTemplate 來代表 System Prompt 以及使用者輸入,最後在對 prompt_template 呼叫 invoke 來傳入我的參數。
from langchain.chat_models import init_chat_model
from langchain_core.prompts import ChatPromptTemplate, SystemMessagePromptTemplate, HumanMessagePromptTemplate
from langchain.globals import set_debug

set_debug(True)


model = init_chat_model("gemini-2.0-flash-001",
                        model_provider="google_genai")

prompt_template = ChatPromptTemplate.from_messages(
    [
        SystemMessagePromptTemplate.from_template(
            "Translate the following from English into {language}"),
        HumanMessagePromptTemplate.from_template("{text}"),
    ]
)

prompt = prompt_template.invoke({"language": "Chinese", "text": "hi!"})

if __name__ == "__main__":
    result = model.invoke(prompt)
    print(f"{'='*36} Result {'='*36}")
    print(result)
    print(result.pretty_print())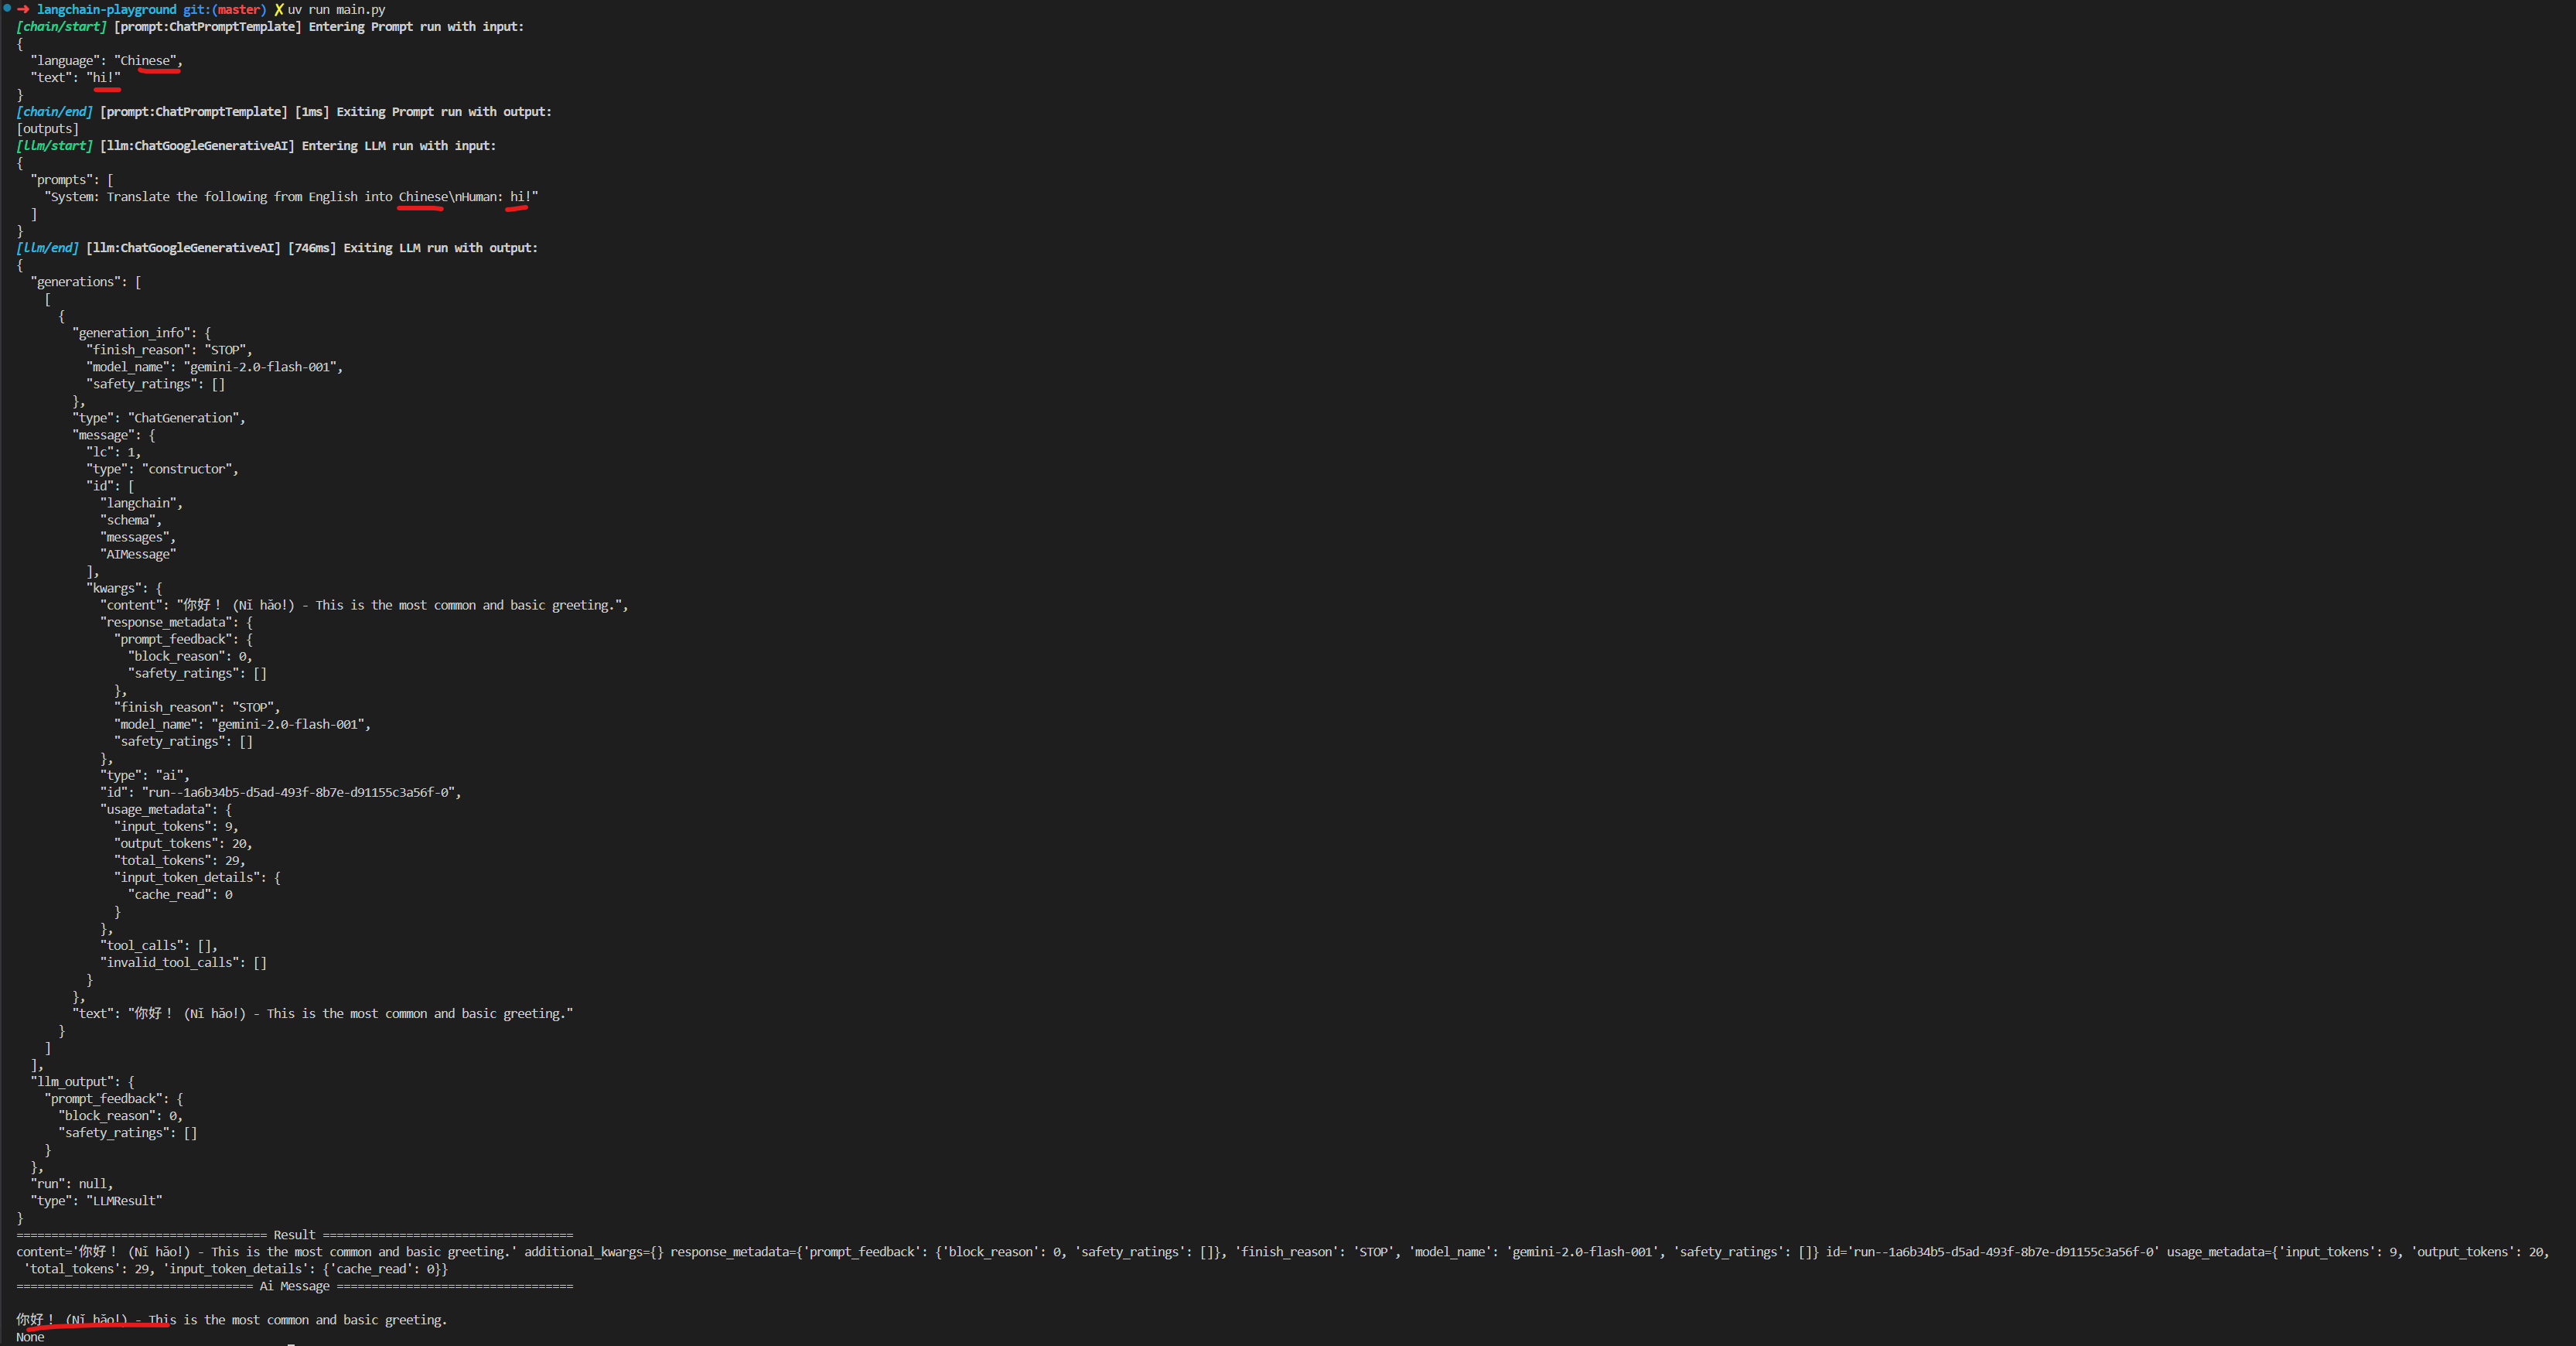
LCEL

LCEL 是 LangChain 定義的特殊語法結構,從前面的例子裡可以看到,在寫一個大模型的程式都會有些固定的步驟,例如:組裝 Prompt、呼叫模型以及最後的從包含元數據的結果裡取出回答,這些固定的步驟可以像流水線一樣串起來,這就是 LangChain 這名子的由來。
from langchain.globals import set_debug
from langchain.chat_models import init_chat_model
from langchain_core.prompts import ChatPromptTemplate, SystemMessagePromptTemplate, HumanMessagePromptTemplate
from langchain_core.output_parsers import StrOutputParser
set_debug(True)
prompt = ChatPromptTemplate.from_messages(
[
SystemMessagePromptTemplate.from_template(
"Translate the following from English into {language}"),
HumanMessagePromptTemplate.from_template("{text}"),
]
)
model = init_chat_model("gemini-2.0-flash-001",
model_provider="google_genai")
parser = StrOutputParser()
chain = prompt | model | parser
if __name__ == "__main__":
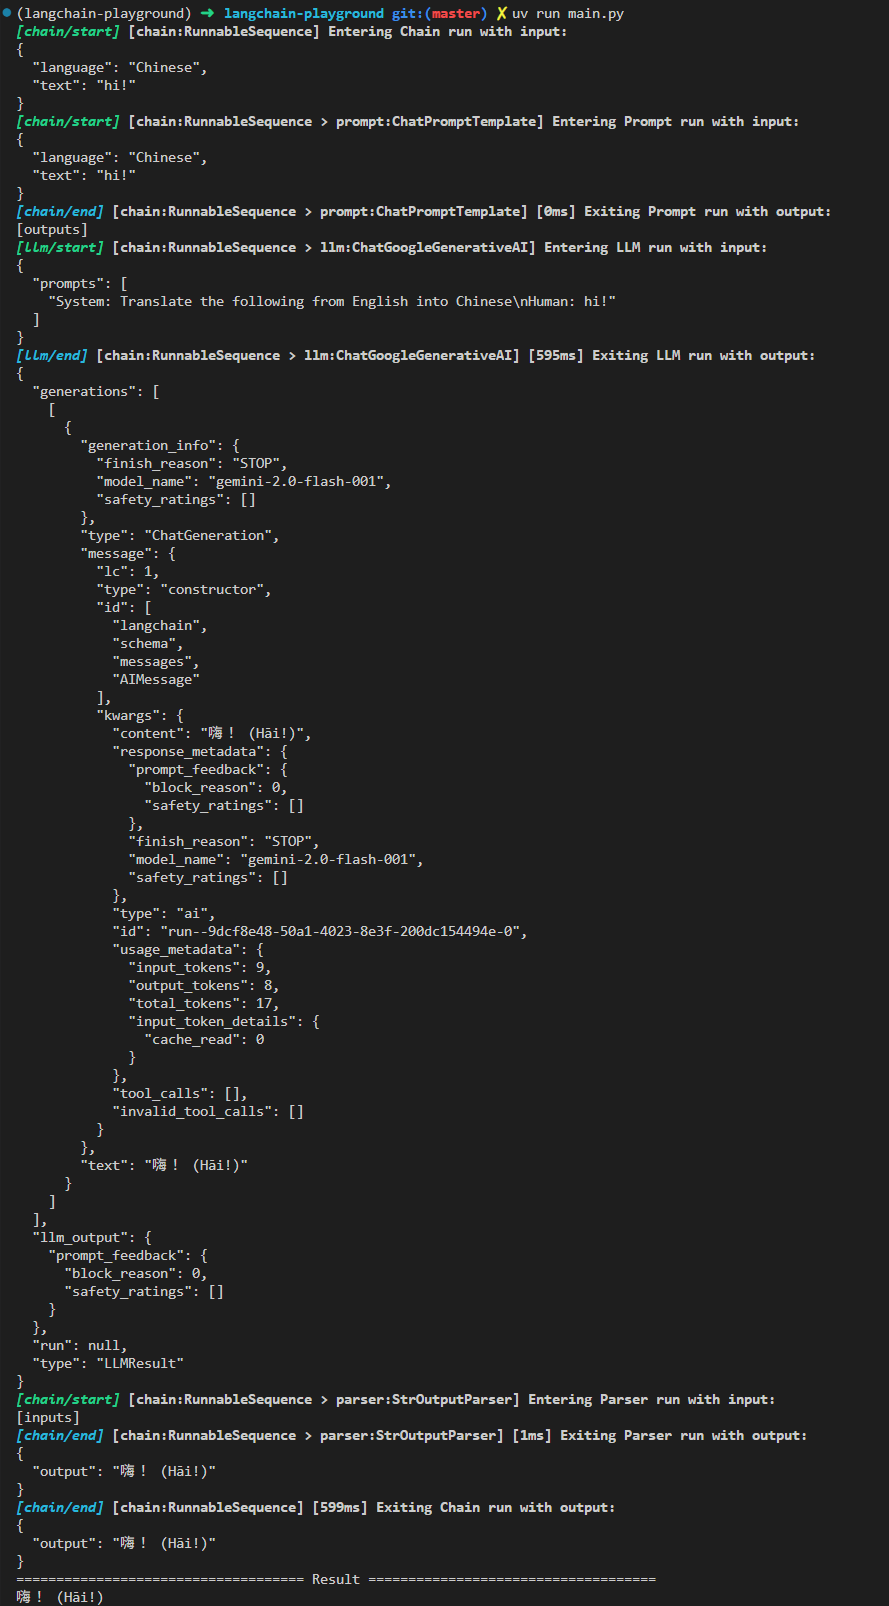
result = chain.invoke({"language": "Chinese", "text": "hi!"})
print(f"{'='*36} Result {'='*36}")
print(result)特過執行範例程式,可以觀察 debug 輸出看 chain 每個步驟是如何被執行的。
LCEL 分支和子鏈

有時候我希望根據不同的使用者輸入有不同的 Prompt 或是不同的流程,如以下的問答流程,我分為專門回答 LangChain 相關的問題或是回答一般性的問題,這種具有分支結構的問答流程透過 LCEL 也可以幫我們達到。

from langchain.globals import set_debug
from langchain.chat_models import init_chat_model
from langchain_core.runnables import RunnableLambda
from langchain_core.prompts import PromptTemplate
from langchain_core.output_parsers import StrOutputParser

set_debug(True)

model = init_chat_model("gemini-2.0-flash-001",
                        model_provider="google_genai")
classification_chain = (
    PromptTemplate.from_template(
        """Given the user question below, classify it as either being about `LangChain` or `Other`.
Do not respond with more than one word.

<question>
{question}
</question>

Classification:"""
    )
    | model
    | StrOutputParser()
)

langchain_chain = PromptTemplate.from_template(
    """You are an expert in langchain. \
Always answer questions starting with "As Harrison Chase told me". \
Respond to the following question:

Question: {question}
Answer:"""
) | model

general_chain = PromptTemplate.from_template(
    """Respond to the following question:

Question: {question}
Answer:"""
) | model


def route(info):
    if "langchain" in info["topic"].lower():
        return langchain_chain
    else:
        return general_chain


full_chain = {"topic": classification_chain,
              "question": lambda x: x["question"]} | RunnableLambda(route) | StrOutputParser()

if __name__ == "__main__":
    result = full_chain.invoke({"question": "how do I use LangChain?"})
    print(f"{'='*36} Result {'='*36}")
print(result)以上的範例程式核心的內容在於,route 這個函數裡面去判斷用來分類的 chain 的出述內容來動態回傳不同場景的 chain,最後把這個函數轉型成 RunnableLambda 就可以把整個流程串起來。
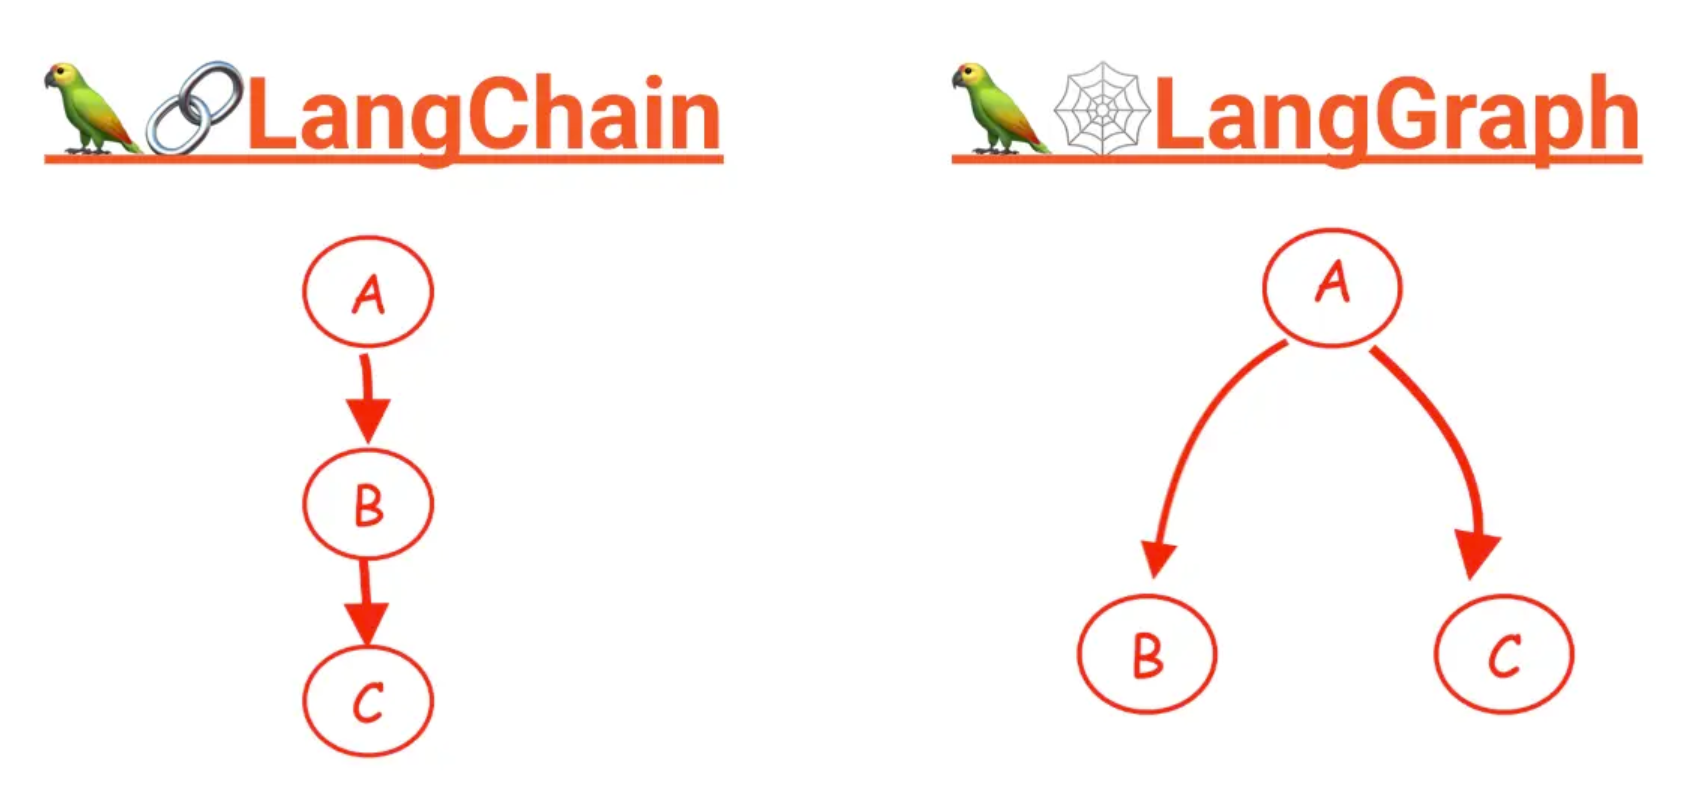
LangGraph

看完 LangChain 的範例,大家可以發現,這個框架適合做一些整體流程是線性一直往下的應用,頂多再做一些分支處理,對於需要記憶上下文以及多輪對話的應用使用 LangChain 來做你需要自己去寫很多管理記憶跟重複迭代的邏輯維護狀態,因此更適合這種應用的框架 LangGraph 就誕生了。
簡易聊天機器人

接下來我們來看把剛剛用 LangChain 做的一問一答的機器人搬來用 LangGraph 寫會長甚麼樣子。
首先需要多裝一個套件,執行:
uv add langgraph然後貼上以下範例程式:
from typing import Annotated, TypedDict
from langchain.chat_models import init_chat_model
from langchain_core.messages import SystemMessage
from langchain_core.prompts import ChatPromptTemplate, HumanMessagePromptTemplate
from langgraph.graph import StateGraph, START, END
from langgraph.graph.message import add_messages
model = init_chat_model("gemini-2.0-flash-001",
model_provider="google_genai")
class State(TypedDict):
messages: Annotated[list, add_messages]
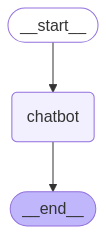
def chatbot(state: State):
return {"messages": [model.invoke(state["messages"])]}
graph_builder = StateGraph(State)
graph_builder.add_node("chatbot", chatbot)
graph_builder.add_edge(START, "chatbot")
graph_builder.add_edge("chatbot", END)
graph = graph_builder.compile()
messages = ChatPromptTemplate.from_messages(
[
SystemMessage(
"You are a helpful assistant. Answer questions in ZH-TW."),
HumanMessagePromptTemplate.from_template("""Respond to the following question:
Question: {question}
Answer:"""),
]
)
if __name__ == "__main__":
print("Welcome to the chatbot. Type 'exit' to quit.")
while True:
question = input("Question: ")
if question == "exit":
break
result = graph.invoke(
input={"messages": messages.format_messages(question=question)},
)
print(result["messages"][-1].content)
整段程式碼最核心就是兩個部分:
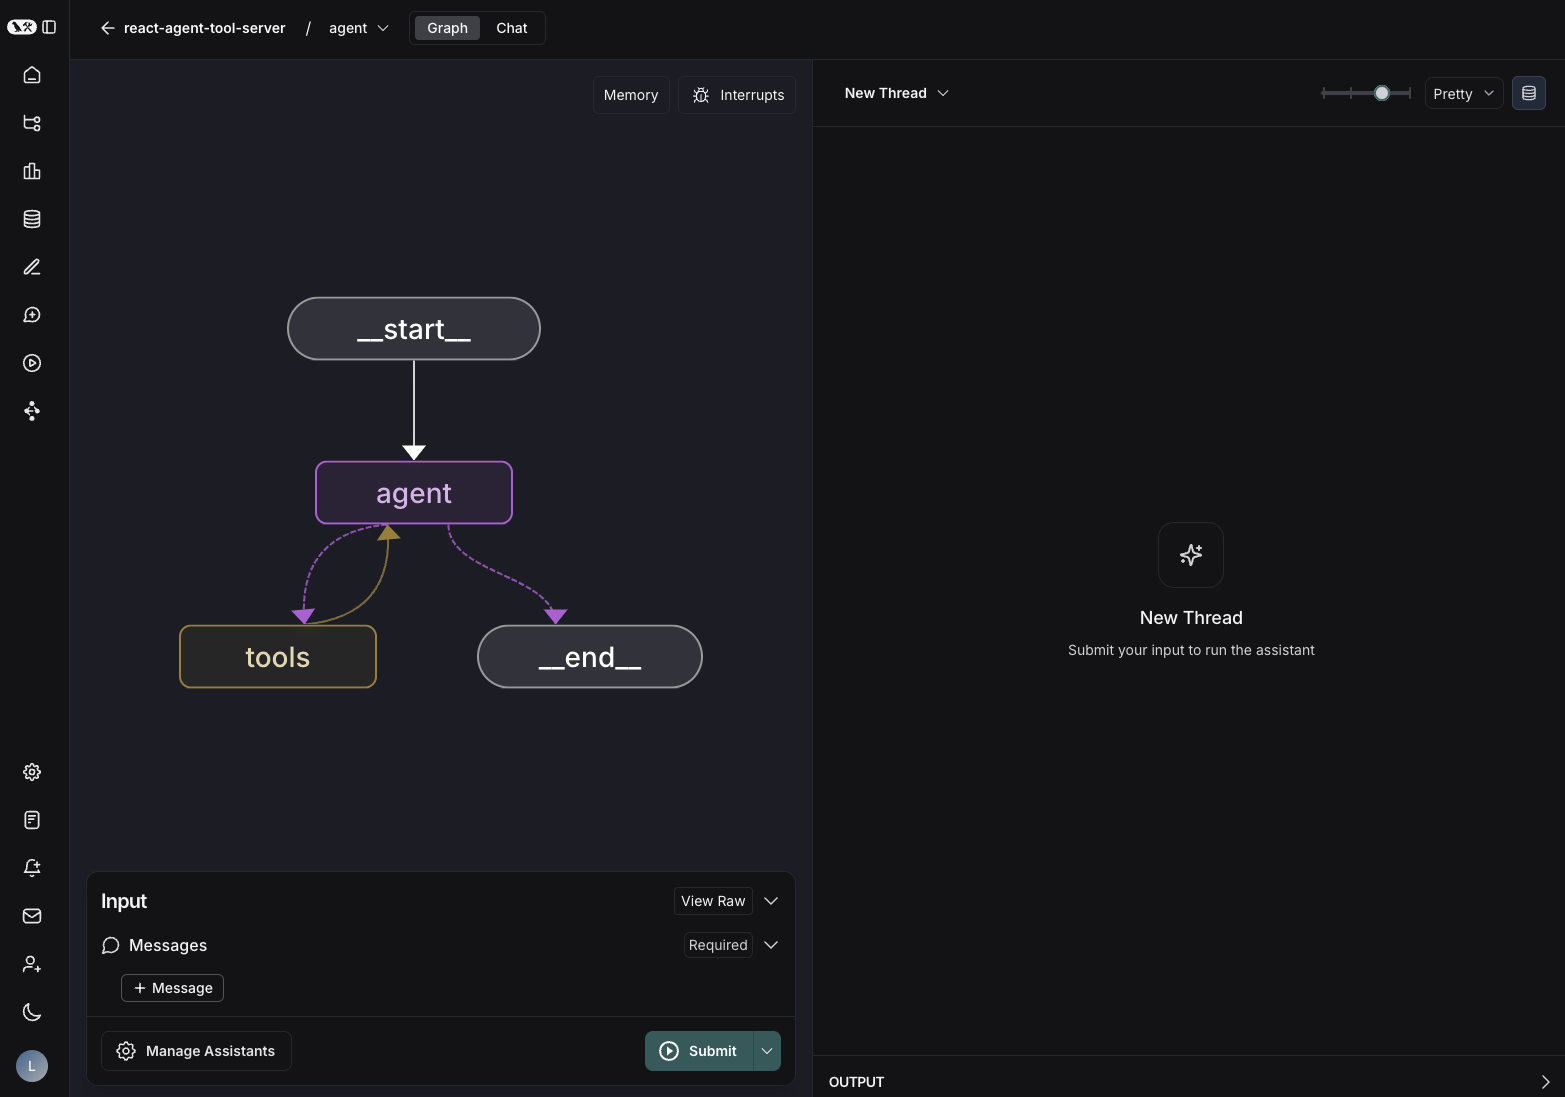
State這個 class,你可以把 LangGraph 理解為一個帶狀態的有限狀態機,這個 class 內的 messages 裡就會存對話的歷史紀錄,在後面的範例裡要加入的記憶功能,也會把多輪對話的記憶不斷追加在這個欄位裡。StateGraph透過對它呼叫add_node以及add_edge來新增點跟邊,在這個範例裡很簡單就只有開始、chatbot、結束三個點然後是一個線性的流程,後面的範例裡我們還會看到具有環得更複雜流程。

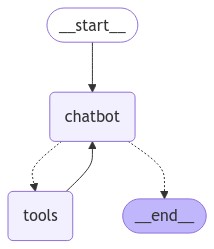
使用 Tools

在 LangGraph 這種基於狀態機結構的基礎下,我們可以透過新增工具節點,來輕鬆達成對 LLM 多次呼叫來自動使用工具的能力。
from typing import Annotated, TypedDict
from langchain.chat_models import init_chat_model
from langchain_core.messages import SystemMessage
from langchain_core.prompts import ChatPromptTemplate, HumanMessagePromptTemplate
from langchain_core.tools import tool
from langgraph.graph import StateGraph, START
from langgraph.graph.message import add_messages
from langgraph.prebuilt import ToolNode, tools_condition
class State(TypedDict):
messages: Annotated[list, add_messages]
@tool
def add(a: int, b: int) -> int:
"""Add two numbers."""
return a + b
@tool
def multiply(a: int, b: int) -> int:
"""Multiply two numbers."""
return a * b
tools = [add, multiply]
model = init_chat_model("gemini-2.0-flash-001",
model_provider="google_genai").bind_tools(tools)
def chatbot(state: State):
return {"messages": [model.invoke(state["messages"])]}
graph_builder = StateGraph(State)
graph_builder.add_node("chatbot", chatbot)
graph_builder.add_node("tools", ToolNode(tools))
graph_builder.add_edge(START, "chatbot")
graph_builder.add_conditional_edges("chatbot", tools_condition)
graph_builder.add_edge("tools", "chatbot")
graph = graph_builder.compile()
messages = ChatPromptTemplate.from_messages(
[
SystemMessage(
"You are a helpful assistant. Answer questions in ZH-TW."),
HumanMessagePromptTemplate.from_template("""Respond to the following question:
Question: {question}
Answer:"""),
]
)
if __name__ == "__main__":
print("Welcome to the chatbot. Type 'exit' to quit.")
while True:
question = input("Question: ")
if question == "exit":
break
result = graph.invoke(
input={"messages": messages.format_messages(question=question)},
)
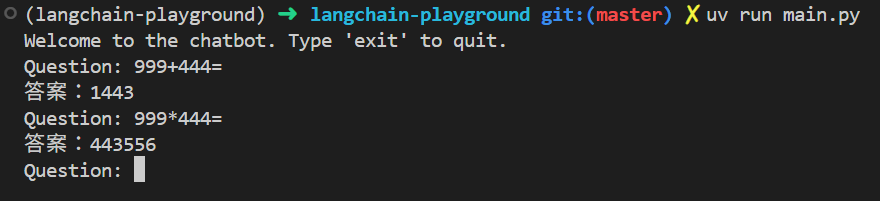
print(result["messages"][-1].content)這段程式碼主要部分與上一個範例類似,但是我們要注意的就是如何去定義 tool,tool 本就是一個簡單的 python 函數,帶是需要用 pydandic 語法標示好輸入的型態,以及寫上工具用途的註解,LLM 會依照這些資訊來判斷何時該使用這個工具 (bind_tools 這個呼叫就是這個用途)。
除此之外,我們還需要把工具節點新增到我們的狀態機中,做完匯市如下圖的結構。
然後就可以試試看:
上下文記憶

到目前為止,我們的機器人還是沒有記憶能力的,現在我們來給他加上記憶的功能,這樣就能夠真正的多輪對話。
import uuid
from typing import Annotated, TypedDict
from langchain.chat_models import init_chat_model
from langchain_core.messages import SystemMessage
from langchain_core.prompts import ChatPromptTemplate, HumanMessagePromptTemplate
from langchain_core.tools import tool
from langgraph.graph import StateGraph, START
from langgraph.graph.message import add_messages
from langgraph.checkpoint.memory import MemorySaver
from langgraph.prebuilt import ToolNode, tools_condition
class State(TypedDict):
messages: Annotated[list, add_messages]
@tool
def add(a: int, b: int) -> int:
"""Add two numbers."""
return a + b
@tool
def multiply(a: int, b: int) -> int:
"""Multiply two numbers."""
return a * b
tools = [add, multiply]
model = init_chat_model("gemini-2.0-flash-001",
model_provider="google_genai").bind_tools(tools)
def chatbot(state: State):
return {"messages": [model.invoke(state["messages"])]}
graph_builder = StateGraph(State)
graph_builder.add_node("chatbot", chatbot)
graph_builder.add_node("tools", ToolNode(tools))
graph_builder.add_edge(START, "chatbot")
graph_builder.add_conditional_edges("chatbot", tools_condition)
graph_builder.add_edge("tools", "chatbot")
graph_with_memory = graph_builder.compile(checkpointer=MemorySaver())
graph = graph_builder.compile()
messages = ChatPromptTemplate.from_messages(
[
SystemMessage(
"You are a helpful assistant. Answer questions in ZH-TW."),
HumanMessagePromptTemplate.from_template("""Respond to the following question:
Question: {question}
Answer:"""),
]
)
if __name__ == "__main__":
thread_id = str(uuid.uuid4())
print(
f"Welcome to the chatbot (thread_id: {thread_id}). Type 'exit' to quit.")
while True:
question = input("Question: ")
if question == "exit":
break
result = graph_with_memory.invoke(
input={"messages": messages.format_messages(question=question)},
config={"configurable": {"thread_id": thread_id}}
)
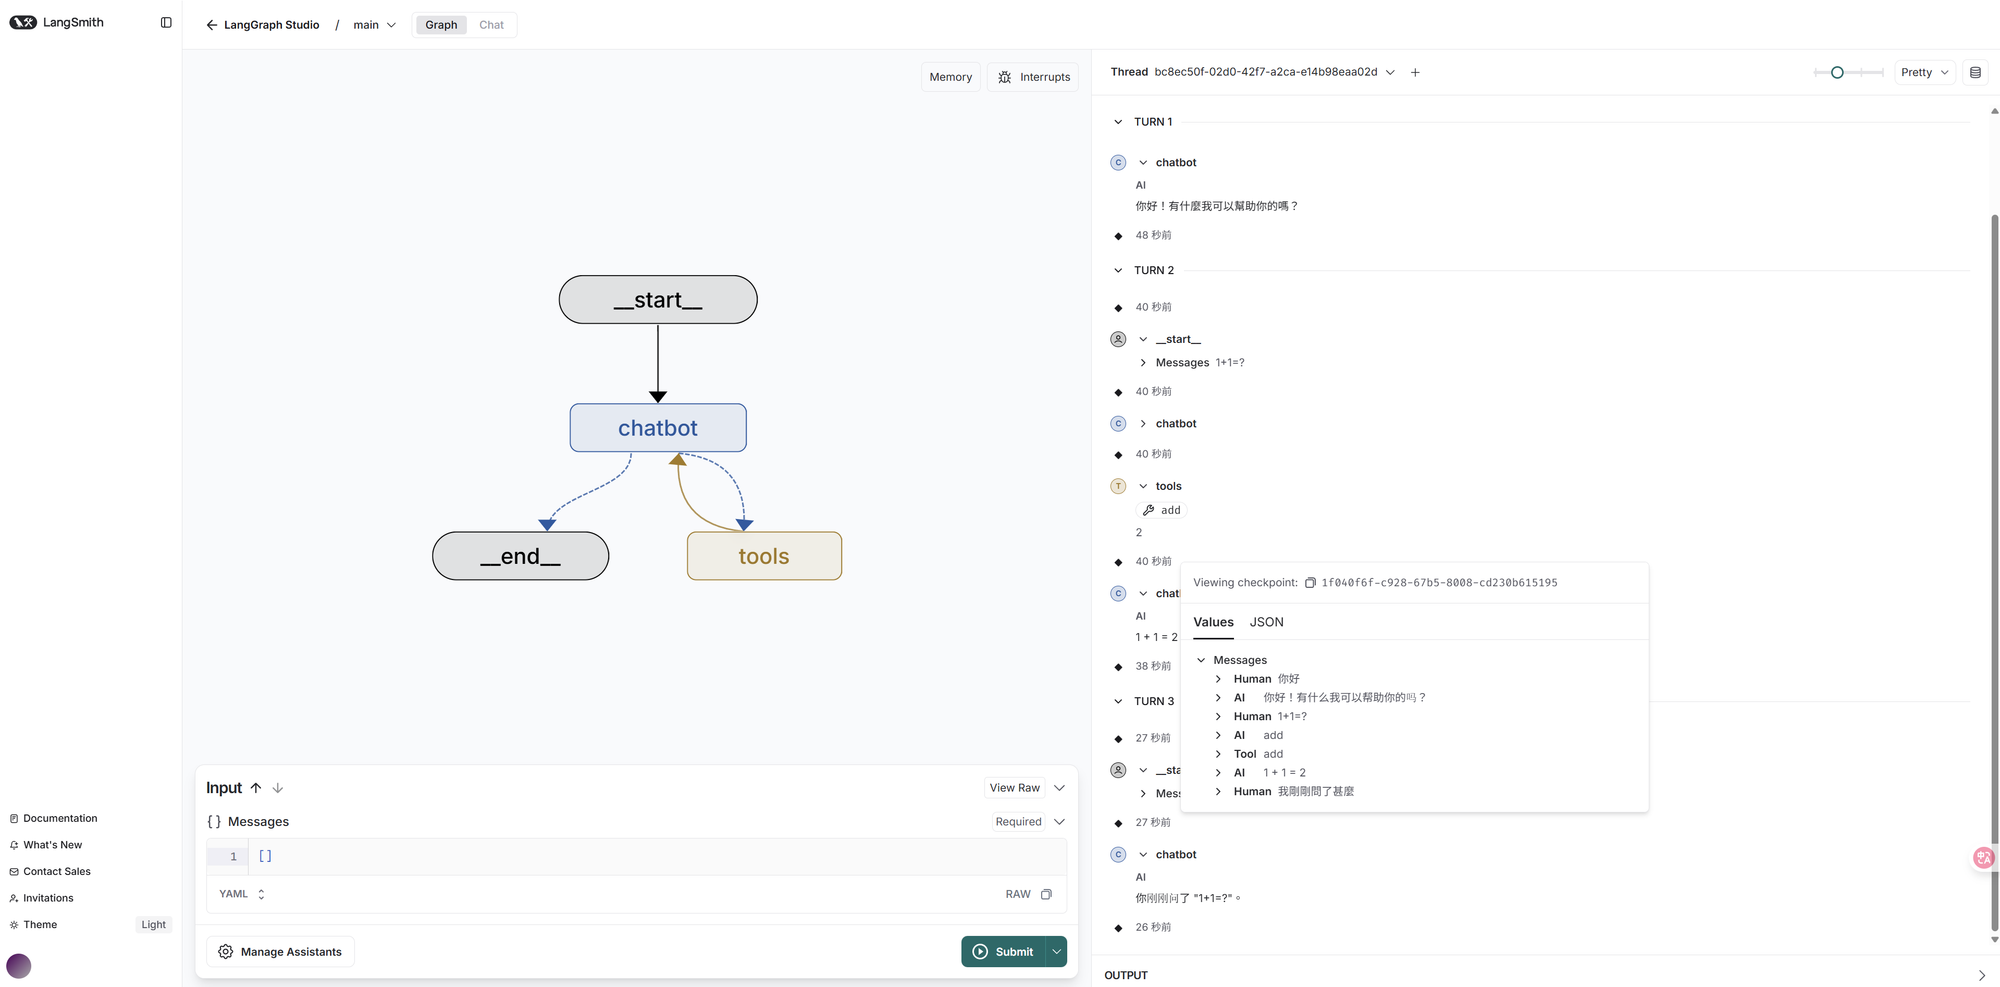
print(result["messages"][-1].content)整段程式碼核心在於,我引用了 MemorySaver 然後 graph_builder.compile 時作為 checkpointer 傳遞進去,最後在每次呼叫時多帶一個固定的 thread_id 就完成了,我們來看看效果。

開發者工具 LangGraph Studio
相信大家一定很好奇這個 LangGraph 背後是怎麼運作的,在 LangChain 我們可以看 debug 日誌來觀察,在 LangGraph 裡我們可以靠這個工具。
首先執行命令安裝:
uv add "langgraph-cli[inmem]"然後你需要在專案目錄下新增 langgraph.json 檔案,內容如下:
{
  "dependencies": ["./main.py"],
  "graphs": {
    "main": "./main.py:graph"
  }
}
最後執行:
langgraph dev就會看到這樣的輸出,通常瀏覽器也會自己打開

用起來會像是這樣,你可以直接跟你的 graph 互動並觀察他如何呼叫工具,以及檢查記憶裡的內容:
開發者工具 LangGraph Builder

最後介紹一個工具 LangGraph Builder 這提供一個視覺化的介面讓你去設計你想要的 graph 結構,然後自動生成程式碼,你只需要專注在實作 python 函數即可,有興趣的可以看這段影片,這裡就不多贅述了。
結語
這篇文章中,我們一同探索了如何利用 LangChain 和 LangGraph 這兩個強大的框架。從基本的 LLM 應用、動態提示詞範本,到 LCEL 的流水線概念,再深入到 LangGraph 提供的狀態管理、工具使用以及最重要的上下文記憶功能,每一步都讓我們能更有效地建構複雜且智慧的 AI 應用。
希望這次的分享能為您在開發 AI 助理的旅程中帶來一些啟發。LangChain 和 LangGraph 不僅讓開發流程更為順暢,更提供了豐富的工具和彈性,幫助我們克服多輪對話和工具調用的挑戰。如果您也對此感興趣,不妨動手嘗試,親自體驗這些框架帶來的便利。期待未來能看到更多基於這些技術的創新應用,讓我們一起打造更智能、更高效的數位生活!