使用 kubeadm 搭設屬於自己的 home-lab

家裡架站的樹梅派用了一段時間之後,有時候還是想在上面裝一些別的軟體來玩,例如之前文章提到的 n8n,不過樹梅派就只有一張運算效能等資源都還是不太夠,所以就有了自建 Kubenetes 的念頭這樣就能玩更多東西,所以寫一下這篇文章記錄一下安裝過程,萬一之後搞壞了可以不用從頭查文件。
 Wan, Jiun-Wei
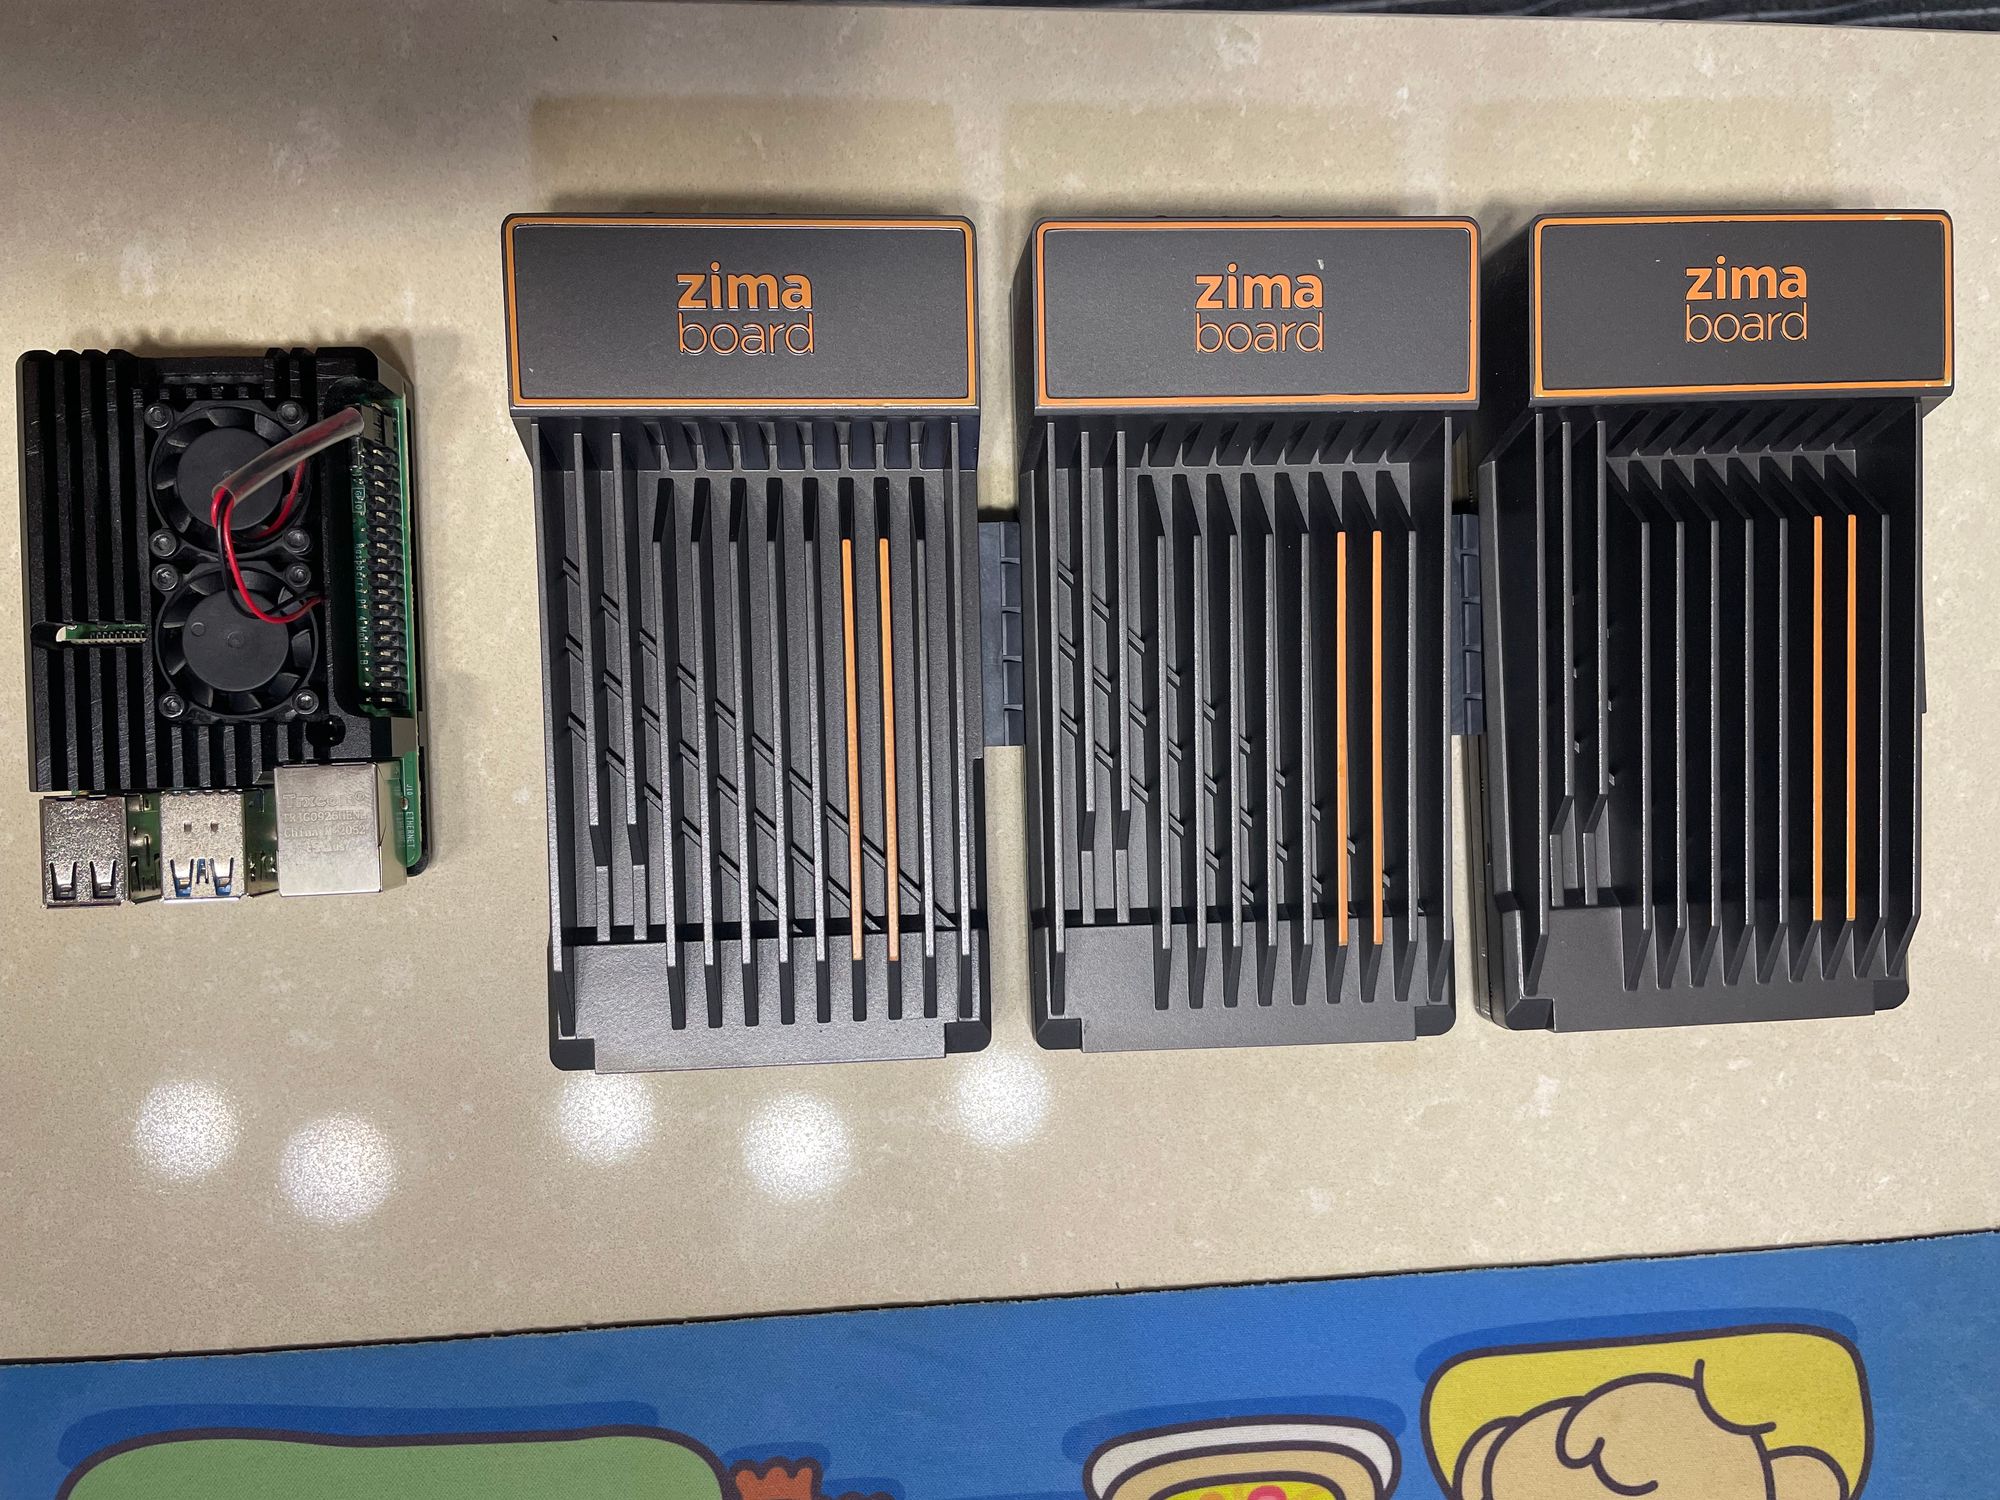
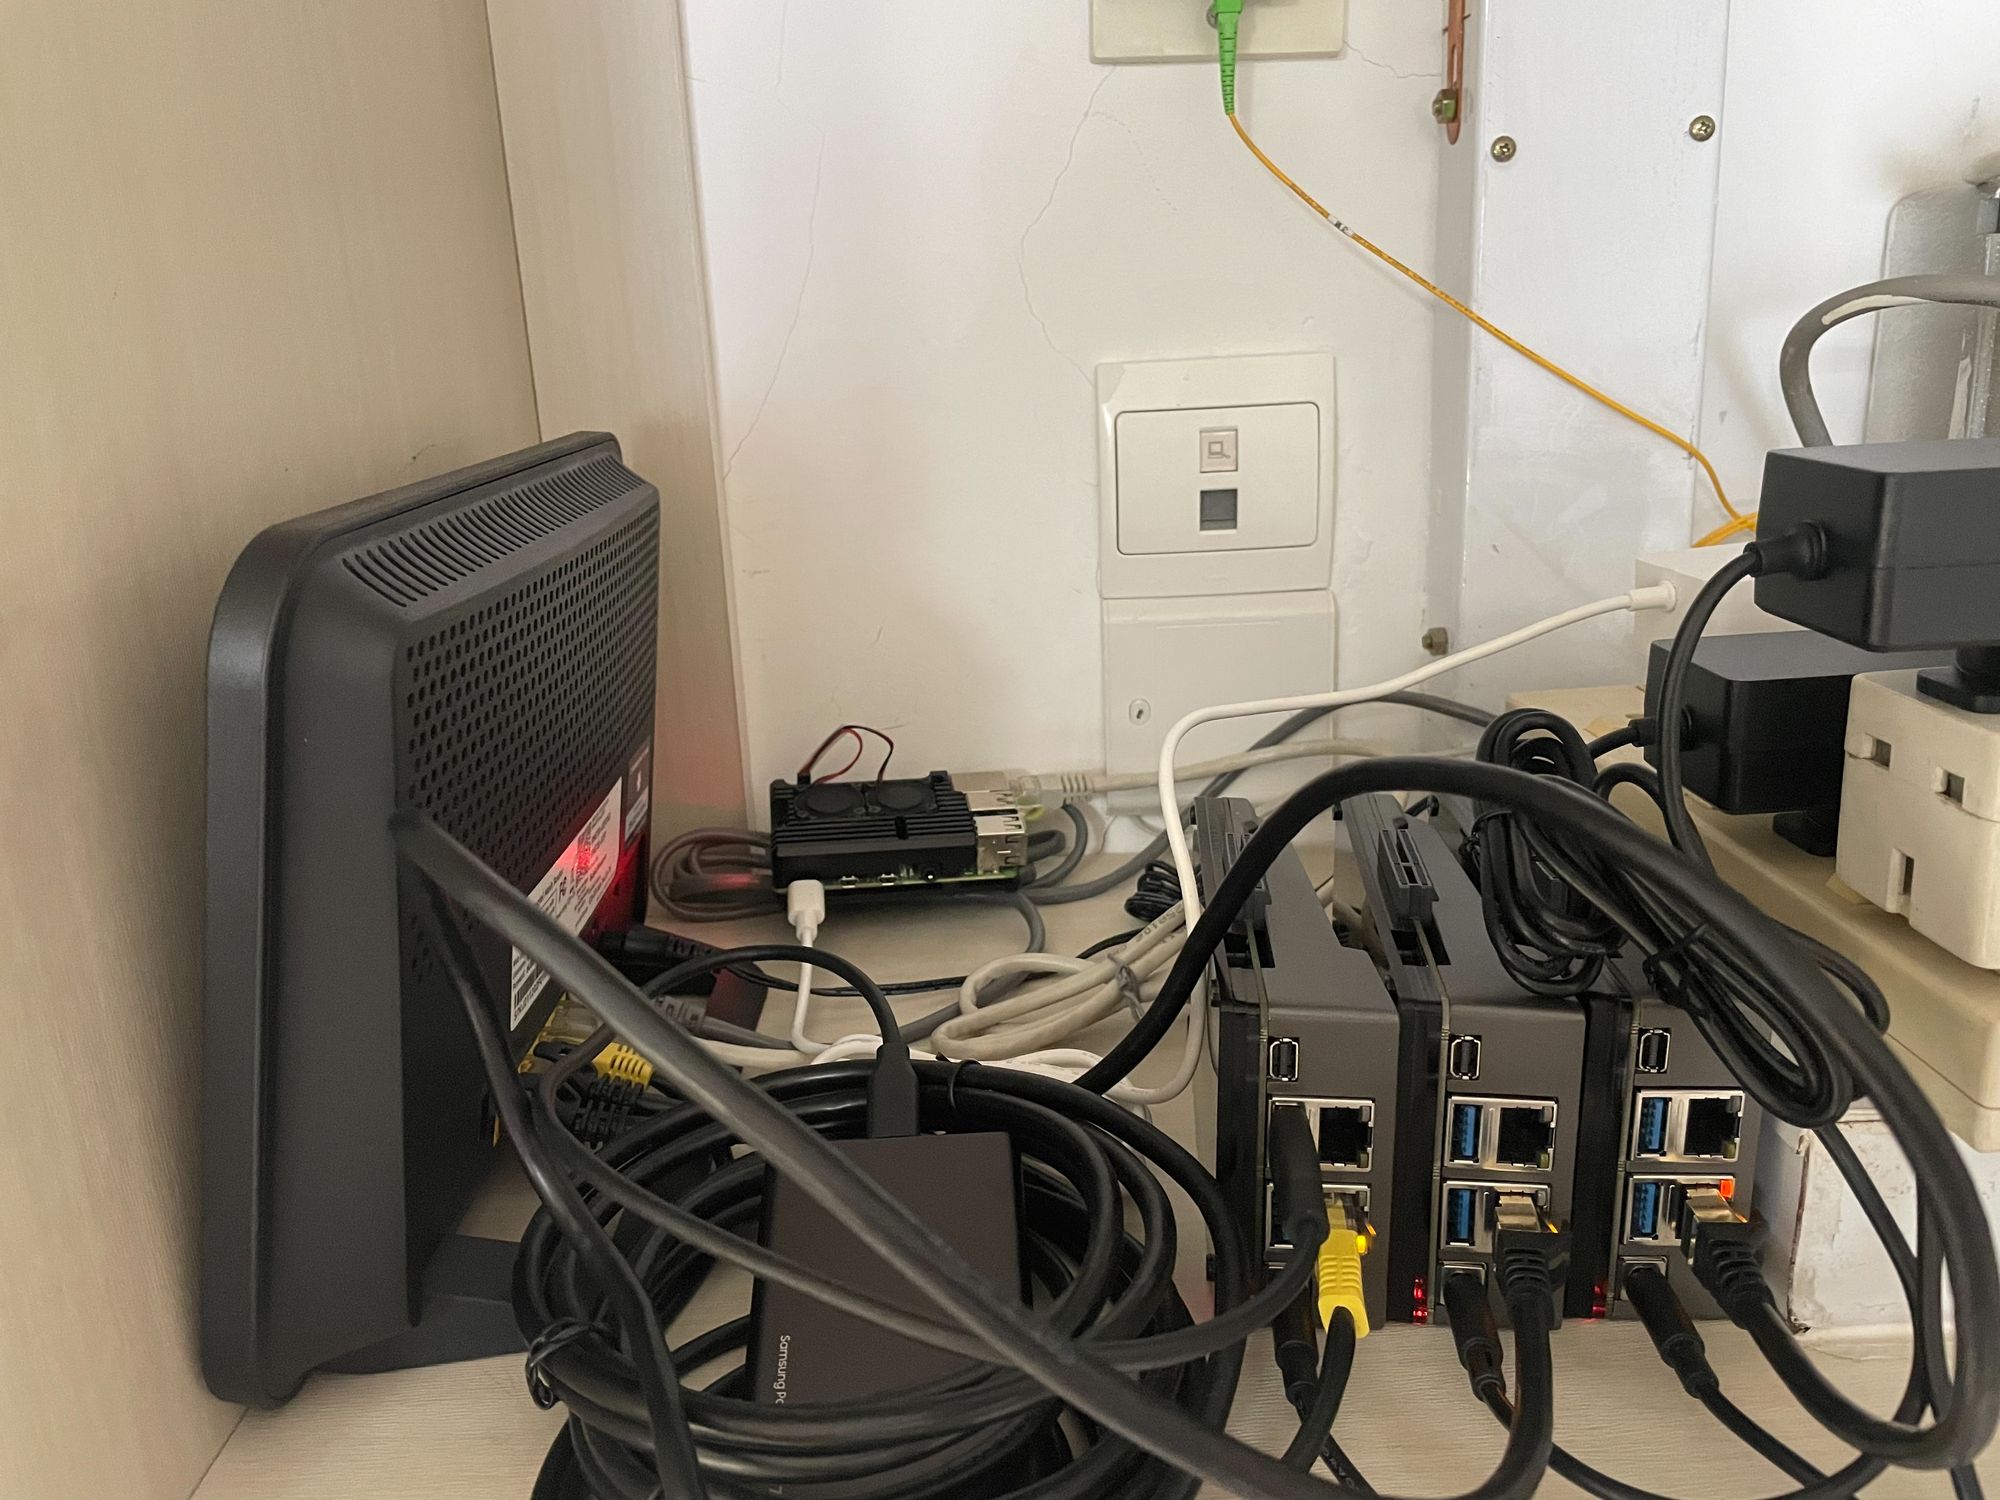
現在樹梅派不知道甚麼原因,價格不斷再上漲,而且他架構是 Arm64 的,有些 Docker image 不一定有 ARM64 版本,剛好朋友推薦了這個 ZimaBoard 他是搭載 Intel N3450 CPU,買到最頂的規格是 4 Core 8 GB Memory,內建 32 GB Disk 拿來跑 Kubernetes 綽綽有餘。
Kubenetes 是甚麼?
這篇會主要介紹我怎麼搭建集群的,關於 Kubernetes 本身的介紹,請參閱官網。

好了,部落格開頭例行性的背景介紹廢話都說完了,下面開幹。
集群規劃
資源需求
集群主要需求是至少能跑一個 Ghost 的容器,然後可能還會想在上面搭 Plex Media Server 滿足在家裡看電影的需求,另外預留一些資源來跑想玩的東西 ArgoCD、Knative......
因此就先買了 3 張 ZimaBoard 當作 Worker Node,Control Plane 就用原本架站的樹梅派來裝,HA 的部分就暫時不考慮,畢竟預算有限而且架在家裏網路、電源都沒有備案,光是集群 HA 也沒用。

針對 Control Plane 我們搭設的三個 Worker Node 的小型集群,並且 etcd、api-server...,都塞在一台上面以我這台樹梅派的 CPU 4 Core,Memory 8GB 是還夠用,唯一要注意的是 Disk 部分,可以參考以下 etcd 官網的建議規格。

在購買記憶卡的時候 Class 10 以上的卡,我是買下面這一張,雖然規格跟建議的 IOPS 還差一點,但是用起來還可以。


硬體配置
Control Plane Raspberry Pi 4 Model B * 1
CPU Broadcom BCM2711, Quad core Cortex-A72 (ARM v8) 64-bit SoC @ 1.8GHz
Memory 8GB LPDDR4-3200 SDRAM
Disk 64GB SanDisk Extreme A2 64GB microSDXC UHS-I U3 V30
Worker Node ZimaBoard 832 *3
CPU Intel Celeron N3450 Quad Core 1.1-2.2GHz
Memory 8G LPDDR4
Disk 32GB eMMC
Network
就是拿家裡網路的 AP 接實體網路線,速度規格我也沒去查,反正很快。
軟體配置
OS Ubuntu Server 23.04 (64-bit)
Kubernetes v1.27.2 install by kubeadm
CRI Contanierd
Network Plugins Cilium with no kube-proxy mode
Addons
Kubernetes Metrics Server
用來蒐集 Node Pod 使用的資源情形,這個沒裝 kubectl top pod、HPA 不能用。
Local Path Provisioner
提供 local-path 這個 Storage Class 這樣要掛 PV 更方便,還能指定 PV 在 Node 上儲存的路徑,這樣之後家裡用剩的隨身碟可以插到 Worker 上擴充。
開始安裝 Control Plane
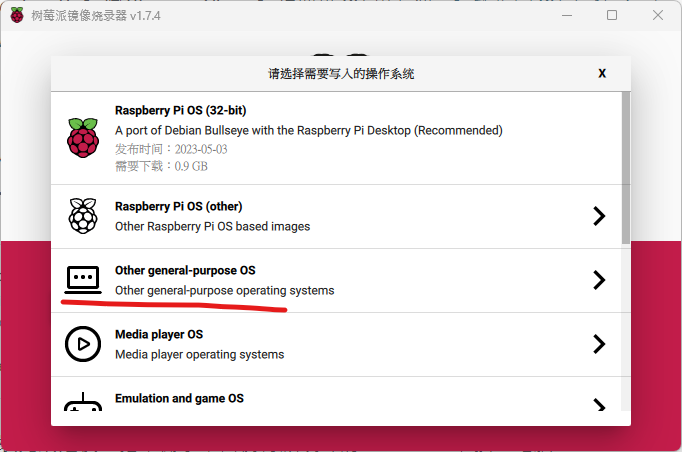
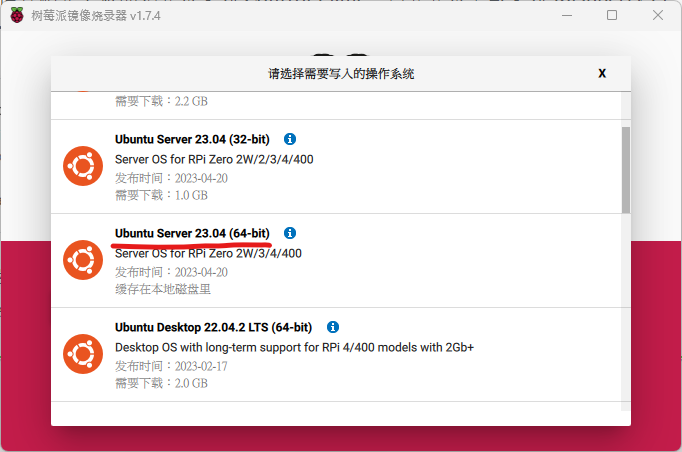
前面設備介紹完之後開始先來安裝 Control Plane。首先先來下載安裝 Raspberry Pi Imager。
 Raspberry Pi Ltd
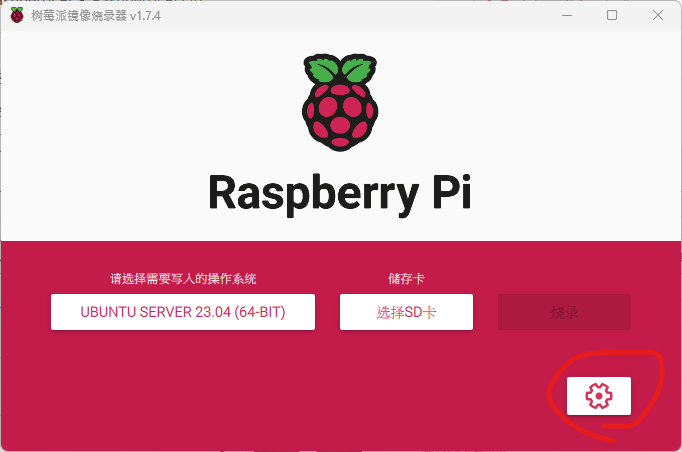
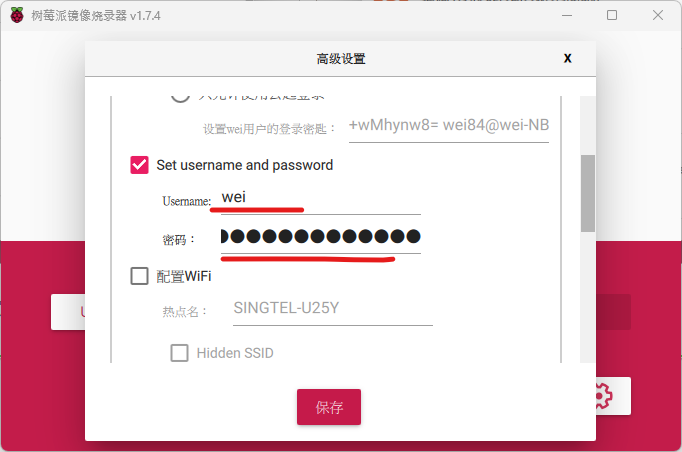
下載安裝完成之後,把準備拿來當樹梅派硬碟的 micro SD 卡接上電腦,開啟 Raspberry Pi Imager 選擇 Other general-purpose OS,然後選擇 Ubuntu Server 23.04 (64-bit),然後
接著設定一下登入的使用者帳號密碼,好了之後就燒錄,燒完插上樹梅派接上網路線開機。
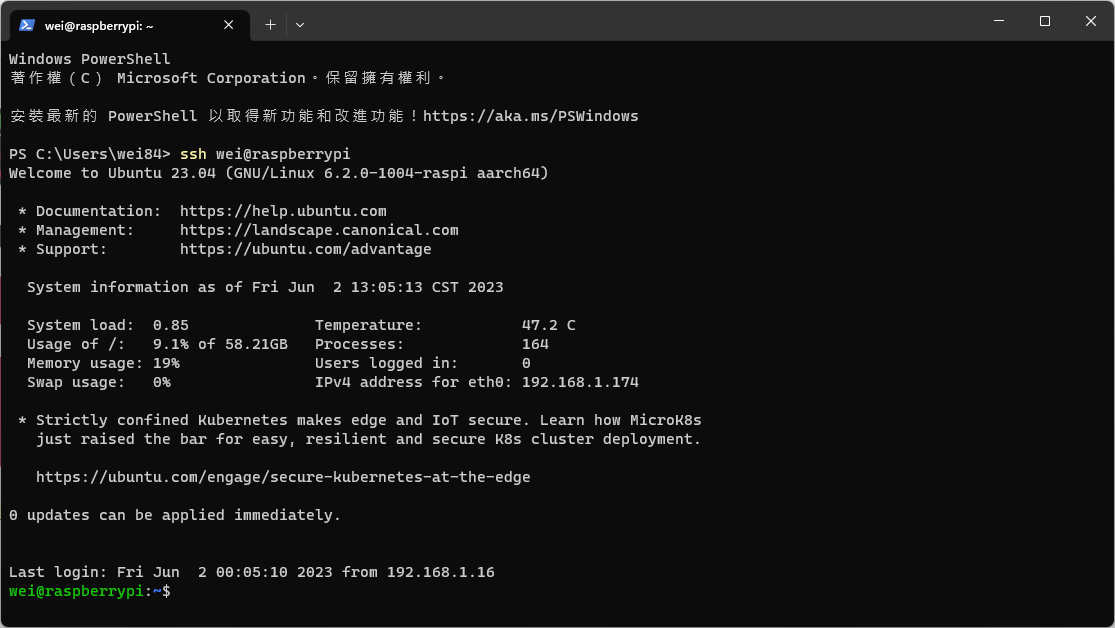
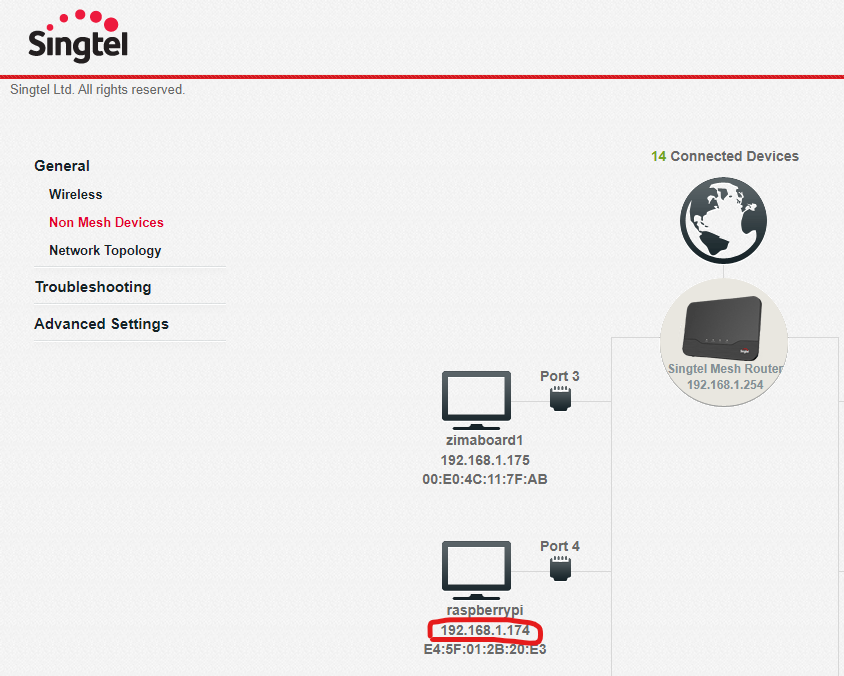
一切順利的話開完機可以透過 raspberrypi 這個 hostname 直接ssh登入系統,因為 Rapberry Pi 版本的 Ubuntu 有內建 avahi-daemon 這個 agent,所以你能在區域網路用主機名字直接解析到機器的 IP;那萬一不行的話可以到家裏 AP 後台介面看一下 IP 是甚麼。再不行的話來看這篇文章的都是工程師,要自己想辦法解決。
前置準備
登入之後首先用以下指令更新一下系統。
sudo apt update
sudo apt upgrade -y
接著需要安裝這個 Kernal module 擴充包,主要是Rapberry Pi 版本的 Ubuntu Kernal 有少一些 Cilium 需要的模組細節可以看一下這個 GitHub issue。
sudo apt install -y linux-modules-extra-raspi
接著關閉 Ubuntu 的自動更新,避免一些預期之外的狀況發生。
sudo nano /etc/apt/apt.conf.d/20auto-upgrades
把檔案內容改成這樣,結尾都是0代表不啟用。
APT::Periodic::Update-Package-Lists "0";
APT::Periodic::Unattended-Upgrade "0";
安裝和配置先決條件
在安裝 Containerd 之前,先依照這篇文章修改一下系統設定。
首先檢查系統 swap 有沒有關閉,預期 total 要看到是 0,沒有的話上網 Google 一下怎麼關。

執行下面的指令,設定轉發 IPv4 並讓 iptables 看到橋接流量。
cat <<EOF | sudo tee /etc/modules-load.d/k8s.conf
overlay
br_netfilter
EOF

sudo modprobe overlay
sudo modprobe br_netfilter

cat <<EOF | sudo tee /etc/sysctl.d/k8s.conf
net.bridge.bridge-nf-call-iptables  = 1
net.bridge.bridge-nf-call-ip6tables = 1
net.ipv4.ip_forward                 = 1
EOF

sudo sysctl --system
分別執行這三條指令檢查一下執行結果。
lsmod | grep br_netfilter
lsmod | grep overlay
sysctl net.bridge.bridge-nf-call-iptables net.bridge.bridge-nf-call-ip6tables net.ipv4.ip_forward

安裝 Containerd
依照下面連結的步驟,我們用套件管理工具來安裝 Containerd 就好,比較簡單。
 containerd
首先執行下面指令設定 Apt repository。
sudo apt install -y ca-certificates curl gnupg

sudo install -m 0755 -d /etc/apt/keyrings
curl -fsSL https://download.docker.com/linux/ubuntu/gpg | sudo gpg --dearmor -o /etc/apt/keyrings/docker.gpg
sudo chmod a+r /etc/apt/keyrings/docker.gpg

echo \
  "deb [arch="$(dpkg --print-architecture)" signed-by=/etc/apt/keyrings/docker.gpg] https://download.docker.com/linux/ubuntu \
  "$(. /etc/os-release && echo "$VERSION_CODENAME")" stable" | \
  sudo tee /etc/apt/sources.list.d/docker.list > /dev/null
接著安裝 Containerd 並鎖定版本。
sudo apt update
sudo apt install -y containerd.io
sudo apt-mark hold containerd.io
安裝完成之後先來確認一下系統的 cgroup 用甚麼 driver,沒意外的話應該要是 systemd。
ps --no-headers -o comm 1

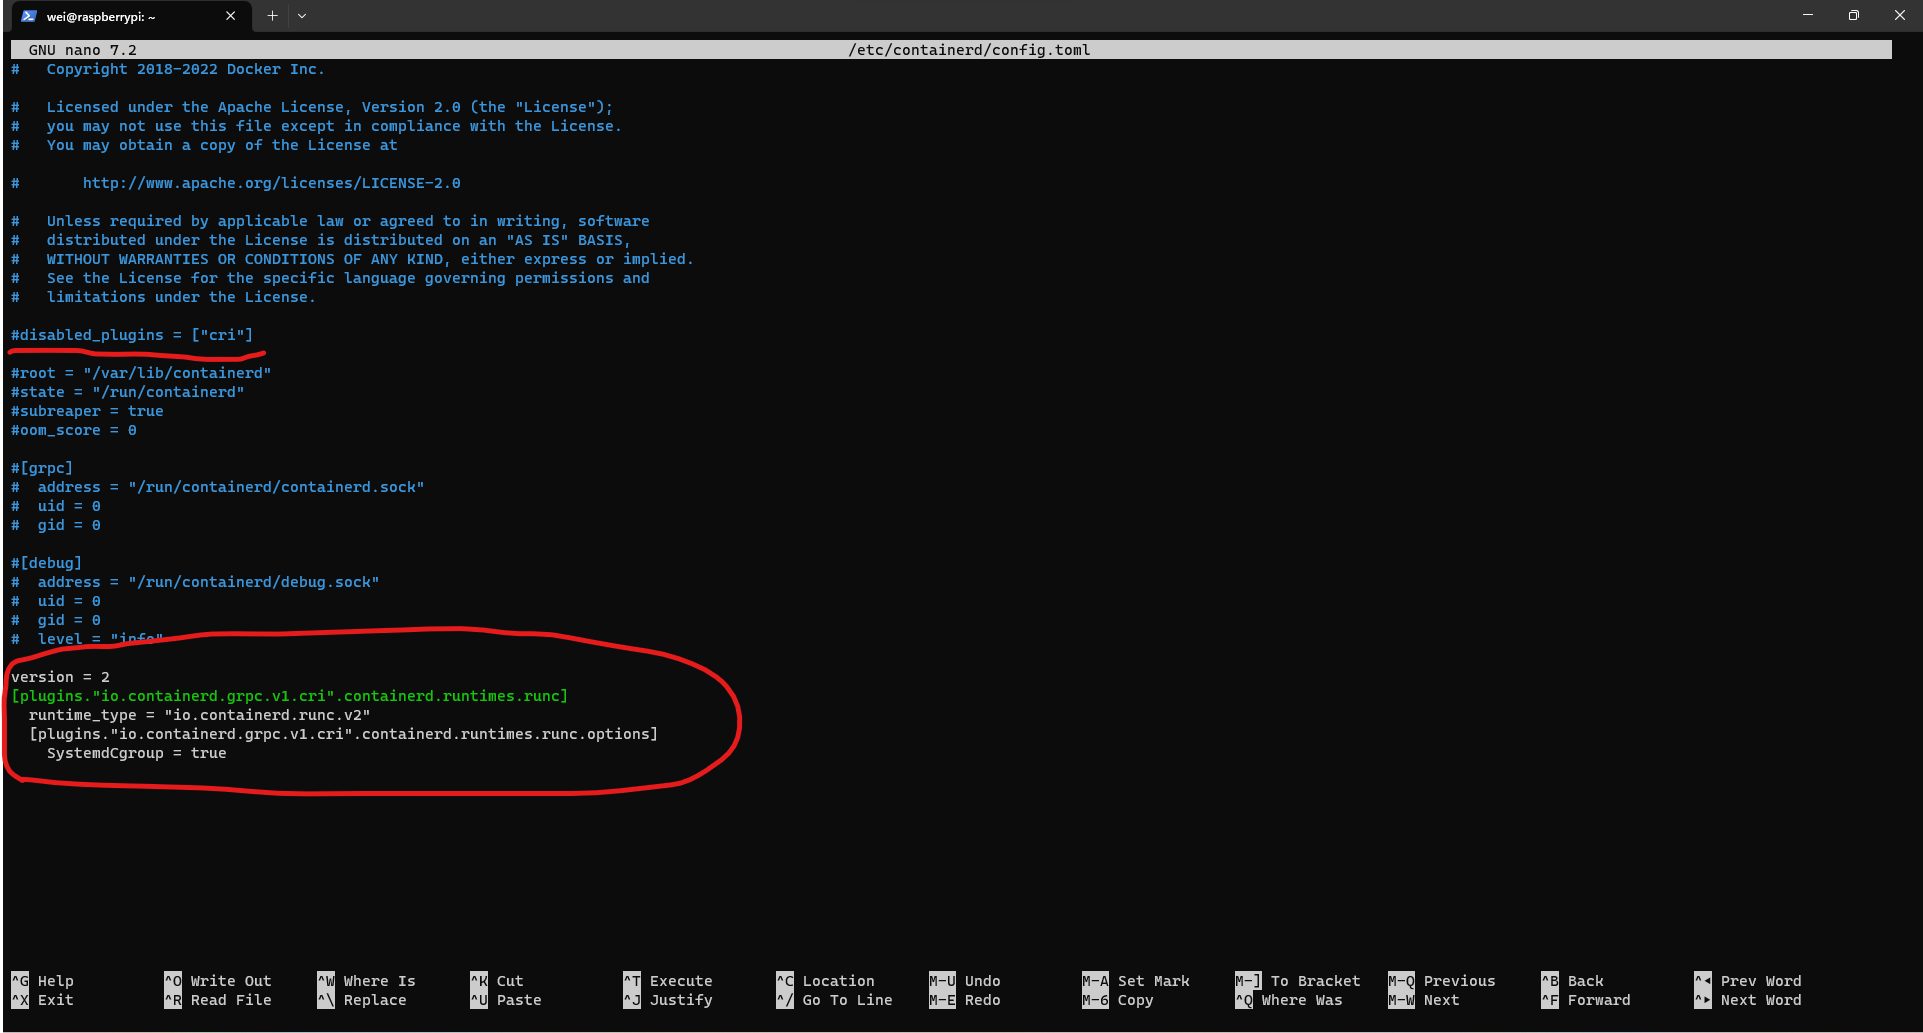
設定一下 Containerd 設定使用 systemd cgroup 作為系統 cgroup 驅動。
sudo nano /etc/containerd/config.toml
把下面的內容貼在檔案最後面。
version = 2
[plugins."io.containerd.grpc.v1.cri".containerd.runtimes.runc]
  runtime_type = "io.containerd.runc.v2"
  [plugins."io.containerd.grpc.v1.cri".containerd.runtimes.runc.options]
    SystemdCgroup = true
畫底線那一行需要註解掉,Kubernetes 需要 CRI 插件才能工作,圈起來地方就是新增的設定。
接著修改一下系統 cgroup 設定,Rapberry Pi 版本的 Ubuntu cgroup memory 沒啟用,先啟用一下,不然後面 kubeadm 安裝會過不了,參考文章可以看這篇。
sudo nano /boot/firmware/cmdline.txt
在檔案最後一行加上這一句後存檔。
cgroup_enable=memory
安裝 kubeadm、kubelet 和 kubectl
接著依照這篇文章來安裝 kubeadm、kubelet、kubectl。
設定 Apt repository。
sudo apt install -y apt-transport-https ca-certificates curl
curl -fsSL https://pkgs.k8s.io/core:/stable:/v1.30/deb/Release.key | sudo gpg --dearmor -o /etc/apt/keyrings/kubernetes-apt-keyring.gpg
echo 'deb [signed-by=/etc/apt/keyrings/kubernetes-apt-keyring.gpg] https://pkgs.k8s.io/core:/stable:/v1.30/deb/ /' | sudo tee /etc/apt/sources.list.d/kubernetes.list
安裝並鎖定版本。
sudo apt update
sudo apt install -y kubelet kubeadm kubectl
sudo apt-mark hold kubelet kubeadm kubectl
重開機
安裝完之後先重開機樹梅派,讓前面有一些設定生效。
sudo reboot
重開完之後再次跑一次系統更新,並把緩存清乾淨。
sudo apt update
sudo apt upgrade -y
sudo apt autoremove --purge
sudo apt clean
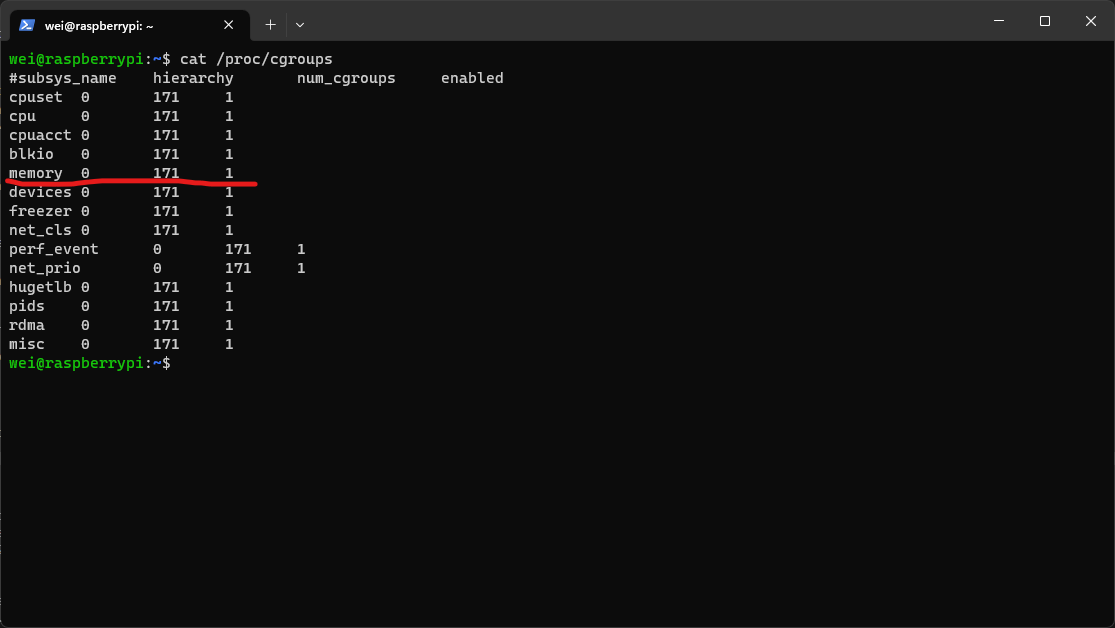
檢查下前面設定的 cgroup memory 有沒有開啟。
cat /proc/cgroups
安裝 Kubernates
執行以下指令安裝 Kubernates。
因為我們前面有提到要使用 Cilium CNI 取代 kube-proxy 組件的功能,所以依照這篇文章的指令來用 kubeadm 初始化 Cluster。
sudo kubeadm init --skip-phases=addon/kube-proxy
等待指令跑完後,你會看到螢幕上有輸出像是下面的輸出,把添加 Worker Node 的指令把它留下來。
Your Kubernetes control-plane has initialized successfully!

To start using your cluster, you need to run the following as a regular user:

  mkdir -p $HOME/.kube
  sudo cp -i /etc/kubernetes/admin.conf $HOME/.kube/config
  sudo chown $(id -u):$(id -g) $HOME/.kube/config

You should now deploy a Pod network to the cluster.
Run "kubectl apply -f [podnetwork].yaml" with one of the options listed at:
  /docs/concepts/cluster-administration/addons/

You can now join any number of machines by running the following on each node
as root:

  kubeadm join <control-plane-host>:<control-plane-port> --token <token> --discovery-token-ca-cert-hash sha256:<hash>
接著複製一下 kubeconfig 檔案讓當前的 User 可以使用 kubectl 指令。
mkdir -p $HOME/.kube
sudo cp -i /etc/kubernetes/admin.conf $HOME/.kube/config
sudo chown $(id -u):$(id -g) $HOME/.kube/config
安裝 Cilium CNI
安裝 Cilium 方法有很多,我們這邊打算使用官方的 Helm Chart 來安裝,先執行下面的指令安裝 Helm 指令。
curl https://raw.githubusercontent.com/helm/helm/main/scripts/get-helm-3 | bash
接著添加 Cilium 官方 Repo 到 Helm 裡面並安裝 Cilium,記得把指令裡的 IP 換成Control Plane IP。
helm repo add cilium https://helm.cilium.io/
API_SERVER_IP=<your_api_server_ip>
API_SERVER_PORT=<your_api_server_port>
helm install cilium cilium/cilium --version 1.13.3 \
    --namespace kube-system \
    --set kubeProxyReplacement=strict \
    --set k8sServiceHost=${API_SERVER_IP} \
    --set k8sServicePort=${API_SERVER_PORT} \
    --set operator.replicas=1
    --set hubble.relay.enabled=true \
    --set hubble.ui.enabled=true
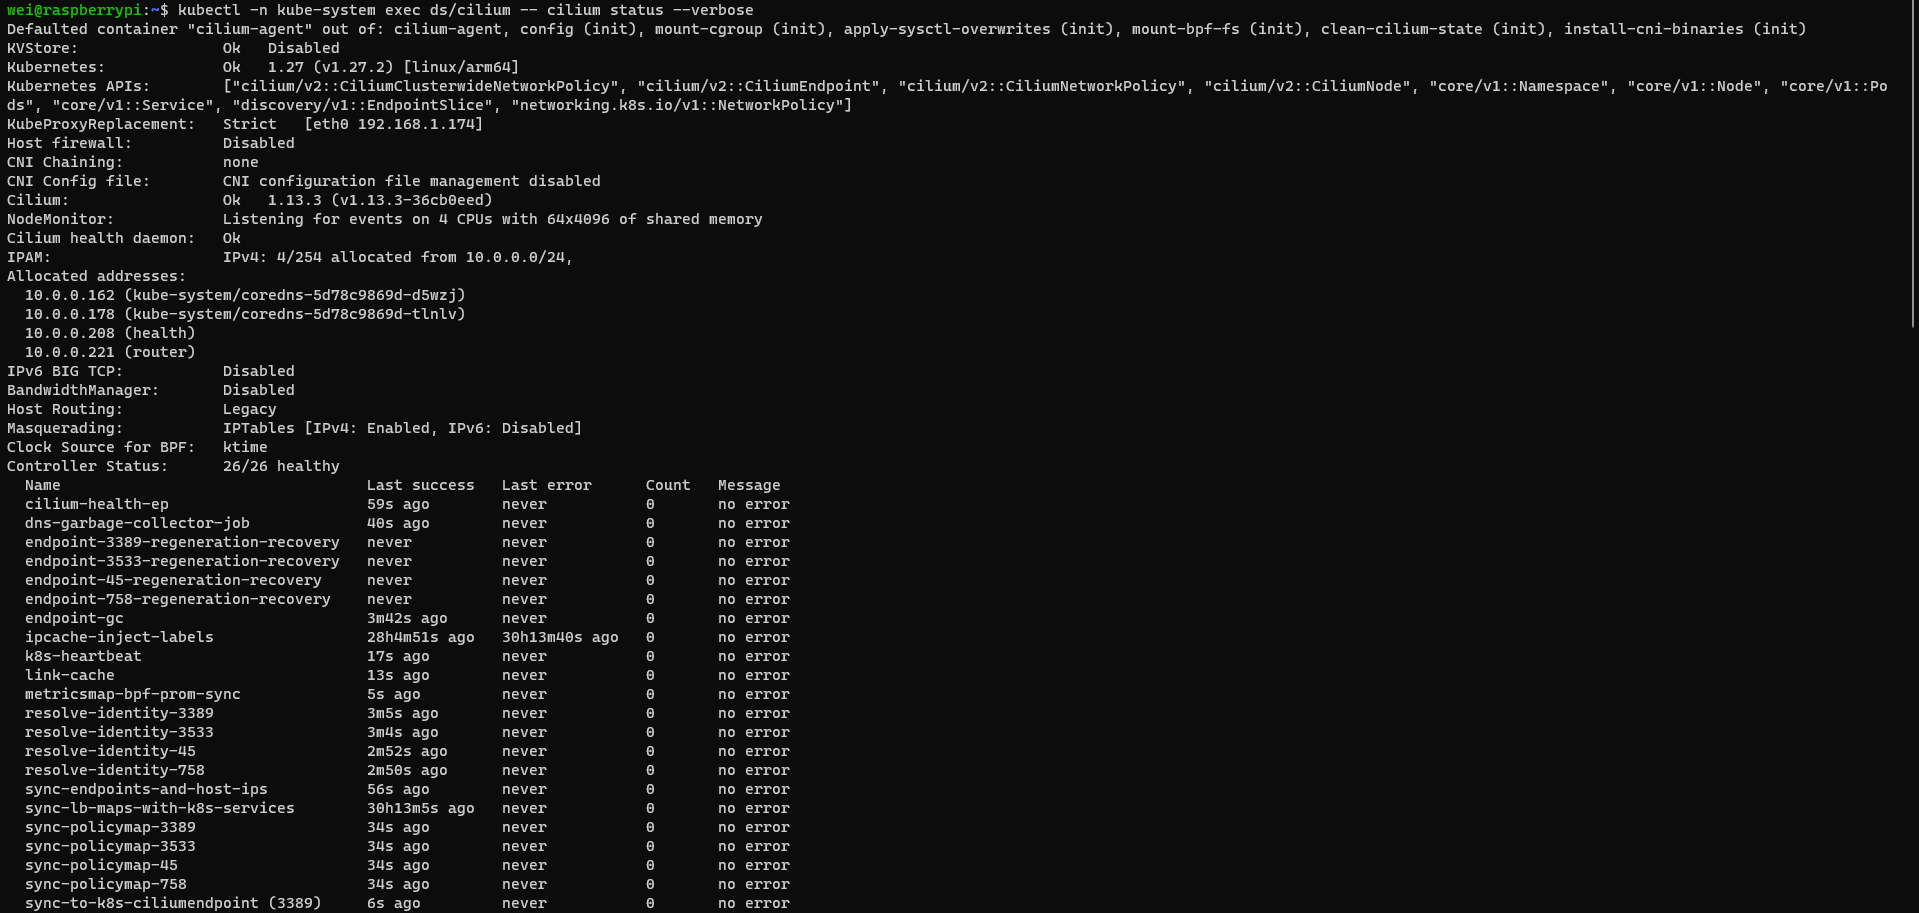
Cilium 有內建一個叫 Hubble 個監控工具可以觀察網路流量,在上面安裝的指令裡也順便一起啟用了。
最後等集群裡的 Pod 都就緒之後,執行下面的指令驗證一下安裝。
kubectl -n kube-system exec ds/cilium -- cilium status | grep KubeProxyReplacement
kubectl -n kube-system exec ds/cilium -- cilium status --verbose

安裝 Worker Node
Worker Node 使用 ZimaBoard 安裝,先去官方網頁下載 Ubuntu Server 鏡像檔。

接著用 Rufus 這個工具製作開機隨身碟。
 Pete Batard
接著參照這個文件,開機隨身碟接上後開機狂按 Del 鍵進入 Bios,選擇 USB 開機後開始安裝 Ubuntu,過程中注意在硬碟設定階段關閉 LVM,並記得啟用 OpenSSH Server,其他都照預設就好。
安裝完成之後,一般版本的 Ubuntu Server 沒有內建 avahi-daemon 這個 agent 需要到家裡 AP 後台看一下機器的 IP ssh 登入。
接著依照以下步驟設定機器,步驟跟 Control Plane 差不多所以就比較簡略說明了。
更新系統
執行以下指令。
sudo apt update
sudo apt upgrade -y
設定系統
關閉 Ubuntu 的自動更新。
sudo nano /etc/apt/apt.conf.d/20auto-upgrades
把檔案內容改成這樣,結尾都是0代表不啟用。
APT::Periodic::Update-Package-Lists "0";
APT::Periodic::Unattended-Upgrade "0";
依照下面步驟關閉 swap。
sudo swapoff -a
sudo rm /swap.img
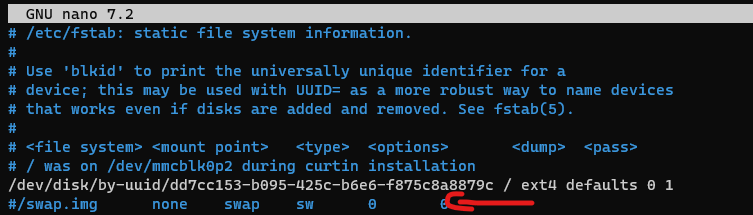
編輯 /etc/fstab 檔案註解掉 /swap.img 開頭的那一行
sudo nano /etc/fstab
執行下面的指令,設定轉發 IPv4 並讓 iptables 看到橋接流量。
cat <<EOF | sudo tee /etc/modules-load.d/k8s.conf
overlay
br_netfilter
EOF

sudo modprobe overlay
sudo modprobe br_netfilter

cat <<EOF | sudo tee /etc/sysctl.d/k8s.conf
net.bridge.bridge-nf-call-iptables  = 1
net.bridge.bridge-nf-call-ip6tables = 1
net.ipv4.ip_forward                 = 1
EOF

sudo sysctl --system
安裝套件
下面的指令把所有指令都整合在一起了,直接執行就好。
sudo apt install -y avahi-daemon
sudo apt install -y ca-certificates curl gnupg

sudo install -m 0755 -d /etc/apt/keyrings
curl -fsSL https://download.docker.com/linux/ubuntu/gpg | sudo gpg --dearmor -o /etc/apt/keyrings/docker.gpg
sudo chmod a+r /etc/apt/keyrings/docker.gpg

echo \
  "deb [arch="$(dpkg --print-architecture)" signed-by=/etc/apt/keyrings/docker.gpg] https://download.docker.com/linux/ubuntu \
  "$(. /etc/os-release && echo "$VERSION_CODENAME")" stable" | \
  sudo tee /etc/apt/sources.list.d/docker.list > /dev/null

sudo apt update
sudo apt install -y containerd.io

sudo apt install -y apt-transport-https ca-certificates curl

curl -fsSL https://pkgs.k8s.io/core:/stable:/v1.30/deb/Release.key | sudo gpg --dearmor -o /etc/apt/keyrings/kubernetes-apt-keyring.gpg

echo 'deb [signed-by=/etc/apt/keyrings/kubernetes-apt-keyring.gpg] https://pkgs.k8s.io/core:/stable:/v1.30/deb/ /' | sudo tee /etc/apt/sources.list.d/kubernetes.list

sudo apt update
sudo apt install -y kubelet kubeadm kubectl
sudo apt-mark hold kubelet kubeadm kubectl containerd.io
設定一下 Containerd 設定使用 systemd cgroup 作為系統 cgroup 驅動。
sudo nano /etc/containerd/config.toml
把下面的內容貼在檔案最後面。
version = 2
[plugins."io.containerd.grpc.v1.cri".containerd.runtimes.runc]
  runtime_type = "io.containerd.runc.v2"
  [plugins."io.containerd.grpc.v1.cri".containerd.runtimes.runc.options]
    SystemdCgroup = true
畫底線那一行需要註解掉,Kubernetes 需要 CRI 插件才能工作,圈起來地方就是新增的設定。
然後直接重開機,重開完成後因為前面的指令有裝了 avahi-daemon 可以用主機名稱登入系統,再更新一下系統並清理緩存。
sudo reboot
更新系統
sudo apt update
sudo apt upgrade -y
sudo apt autoremove --purge
sudo apt clean
加入集群
sudo kubeadm join x.x.x.x:6443 --token xxxxx.xxxxxxxx \
        --discovery-token-ca-cert-hash sha256:xxxxxxxxxxxxxxxxxxxxxxxxxxxxxxxxxxxxxxxxxxxx
接著三台機器都是同樣步驟安裝完依賴後加入節點就好。
安裝 Addons
Kubernetes Metrics Server
kubernetes-sigs先登入 Control Plane 機器,執行下面指令添加 Metrics Server Helm Repo。
helm repo add metrics-server https://kubernetes-sigs.github.io/metrics-server/
接著執行下面指令安裝 Metrics Server。
helm -n kube-system upgrade --install metrics-server metrics-server/metrics-server --set args={--kubelet-insecure-tls}
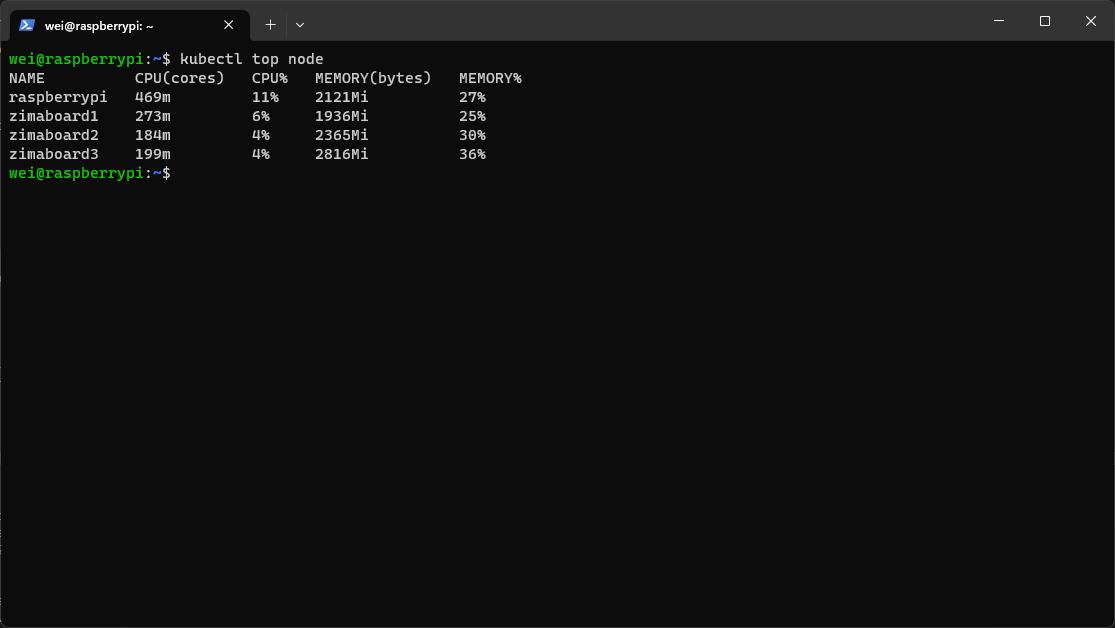
等待 Pod 就緒後執行一下這個指令驗證一下 Metrics Server 正常工作。
kubectl top node
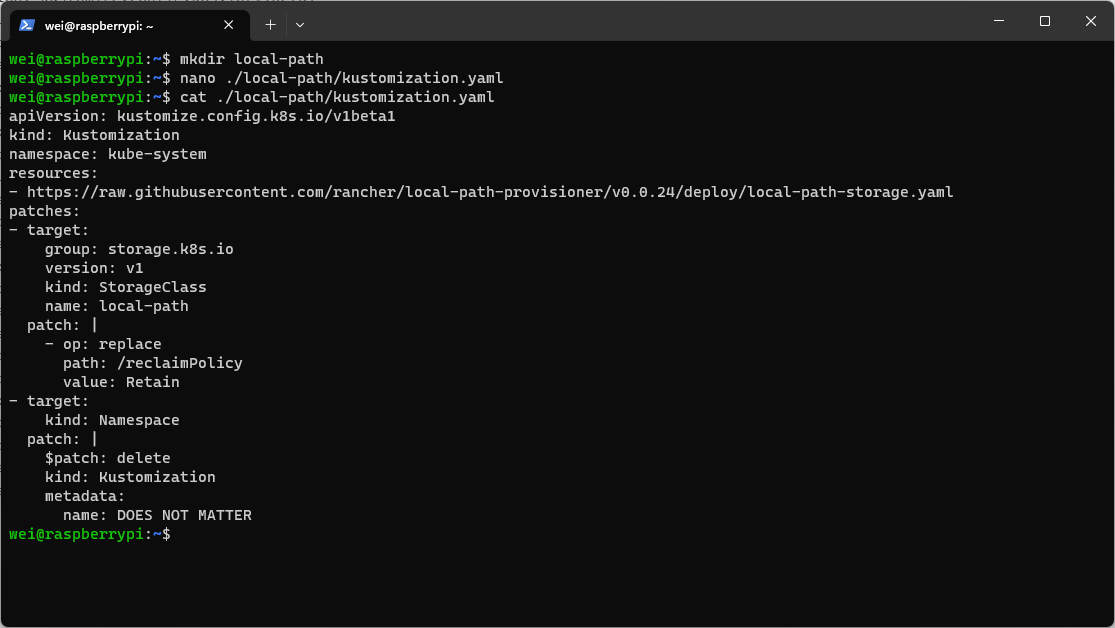
Local Path Provisioner
rancher在家目錄新增一個 local-path 目錄,並把下面的檔案內容放到目錄裡 kustomization.yaml 檔案中。
apiVersion: kustomize.config.k8s.io/v1beta1
kind: Kustomization
namespace: kube-system
resources:
- https://raw.githubusercontent.com/rancher/local-path-provisioner/v0.0.24/deploy/local-path-storage.yaml
patches:
- target:
    group: storage.k8s.io
    version: v1
    kind: StorageClass
    name: local-path
  patch: |
    - op: replace
      path: /metadata/annotations
      value:
        storageclass.kubernetes.io/is-default-class: true
- target:
    kind: Namespace
  patch: |
    $patch: delete
    kind: Kustomization
    metadata:
      name: DOES NOT MATTER
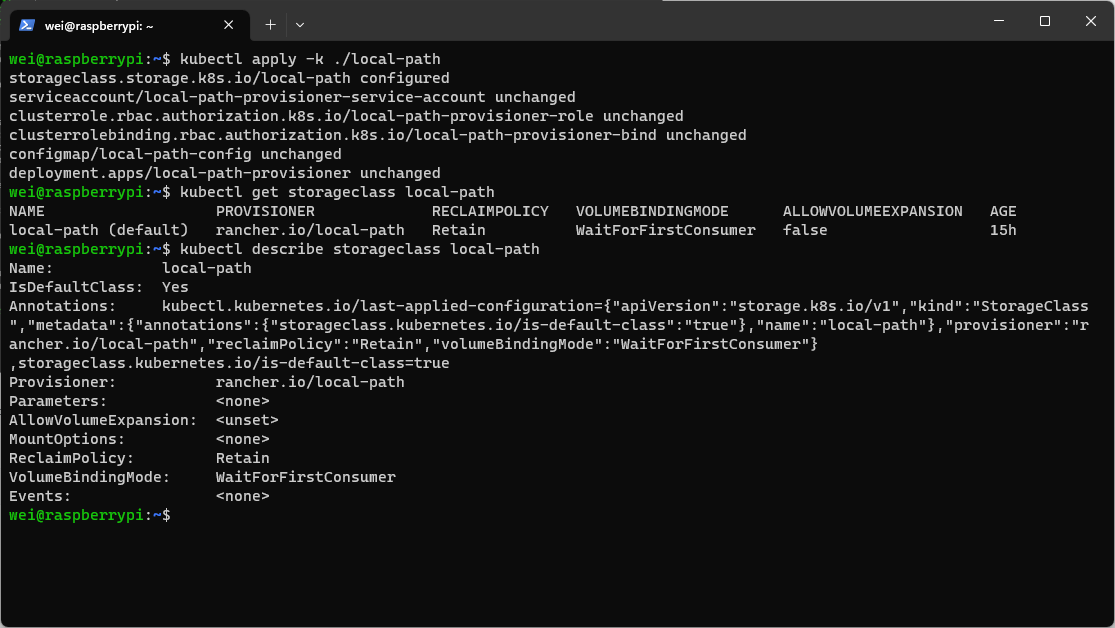
接著執行這個指令安裝,並看一下有沒有安裝成功。
kubectl apply -k ./local-path
kubectl get storageclass local-path
kubectl describe storageclass local-path
大功告成
最後把Control Plan ~/.kube/config 檔案拷貝到自己電腦上一樣位置,在自己電腦上安裝好 kubectl 之後就可以開始用了。
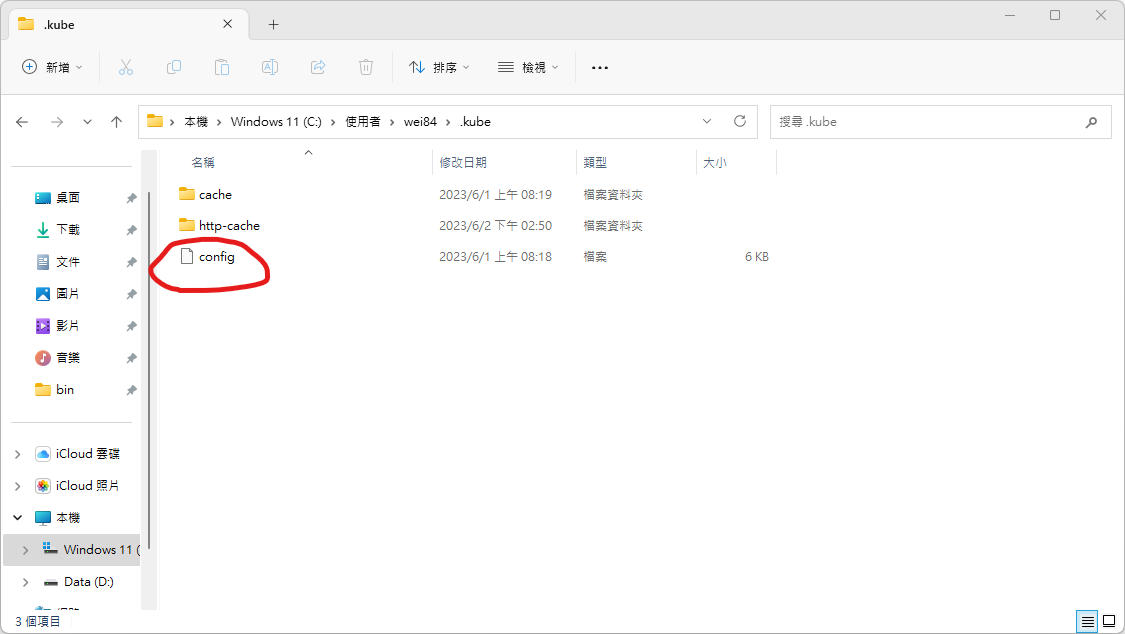
Windows 電腦可以安裝 Docker Desktop 會附帶一起安裝 kubectl 指令。
在安裝過成功使用到的 Kubernetes 配置管理工具 Helm 有興趣的話可以看它官方網站的介紹,寫的還不錯。


而安裝 Local Path Provisioner 過程使用到的 Kustomize 工具可以參考我之前寫的這一篇。
Wan, Jiun-Wei
最後祝大家在探索 Kubernetes 的旅途上一切順利。